

Delivery optimization files can show up as a multi-gigabyte row in Settings or Disk Cleanup, or as a cache folder you cannot open, and the name gives no hint whether removing them is safe. It is safe, and this guide shows three ways to do it (Settings, Disk Cleanup and PowerShell) plus a before-and-after size check. We ran the three deletion methods on Windows 11 Pro build 26300.9711.
Prefer to watch? See the video guide.
What Delivery Optimization Files Are and Why Removing Them Is Safe
Delivery optimization files are cached copies of downloads that Windows keeps so it can reuse them and share them with other PCs. Delivery Optimization is a downloader built into Windows since Windows 10 version 1511, per Microsoft’s overview. It fetches these from Microsoft’s servers, and optionally from other devices on your network:
- Windows Update downloads: feature updates, quality updates, language packs and drivers
- Microsoft Store apps
- Microsoft Defender definition updates and Edge updates
- Microsoft 365 apps and other Microsoft downloads
Peer sharing is optional. On Pro, Enterprise and Education editions the default download mode shares only with PCs on the same network.
The cache only holds copies. Microsoft says Delivery Optimization clears its cache automatically, and its support page tells you to run Disk Cleanup, select that row and delete it when you need space. The row’s own description agrees: “You may safely delete these files if you need the space.”
Heads up: On a work PC managed by an administrator, policy can set the cache size and location, so leave it alone there. Files an administrator pinned with Set-DeliveryOptimizationStatus stay until they expire, unless -IncludePinnedFiles is used in PowerShell.
When Deleting the Cache Will Not Free Much Space
The cache cleans itself, so the row is often smaller than you expect. Ours held 2.11 GB right after a restore and fell to about 865 MiB within roughly ten minutes as expired entries were purged. Two folders people confuse with it have their own guides, listed below.
| Location | What it holds | Where to clean it |
|---|---|---|
| Delivery Optimization cache | Cached copies of Windows and Store downloads | This guide |
| SoftwareDistribution | Windows Update’s own download files | Delete the SoftwareDistribution folder (stop-services and rename steps) |
| WinSxS | The component store | Delete the WinSxS folder (supported DISM cleanup) |
A command that circulates for this task, del /s /q on SoftwareDistribution\Download, empties Windows Update’s folder and leaves this cache untouched.
How to Delete Delivery Optimization Files in Windows 11
The three methods below are ordered from easiest to most technical, and all of them clear the same cache. Sizes differ between the screenshots because the cache was refilled between runs.
Method 1: Delete Delivery Optimization Files in Settings
Settings is the quickest route because the row arrives ticked and one button removes it.
- Open Settings, go to System > Storage and click Temporary files. Windows scans, then lists the files you can remove, with the Delivery Optimization row at the top and its size beside it.
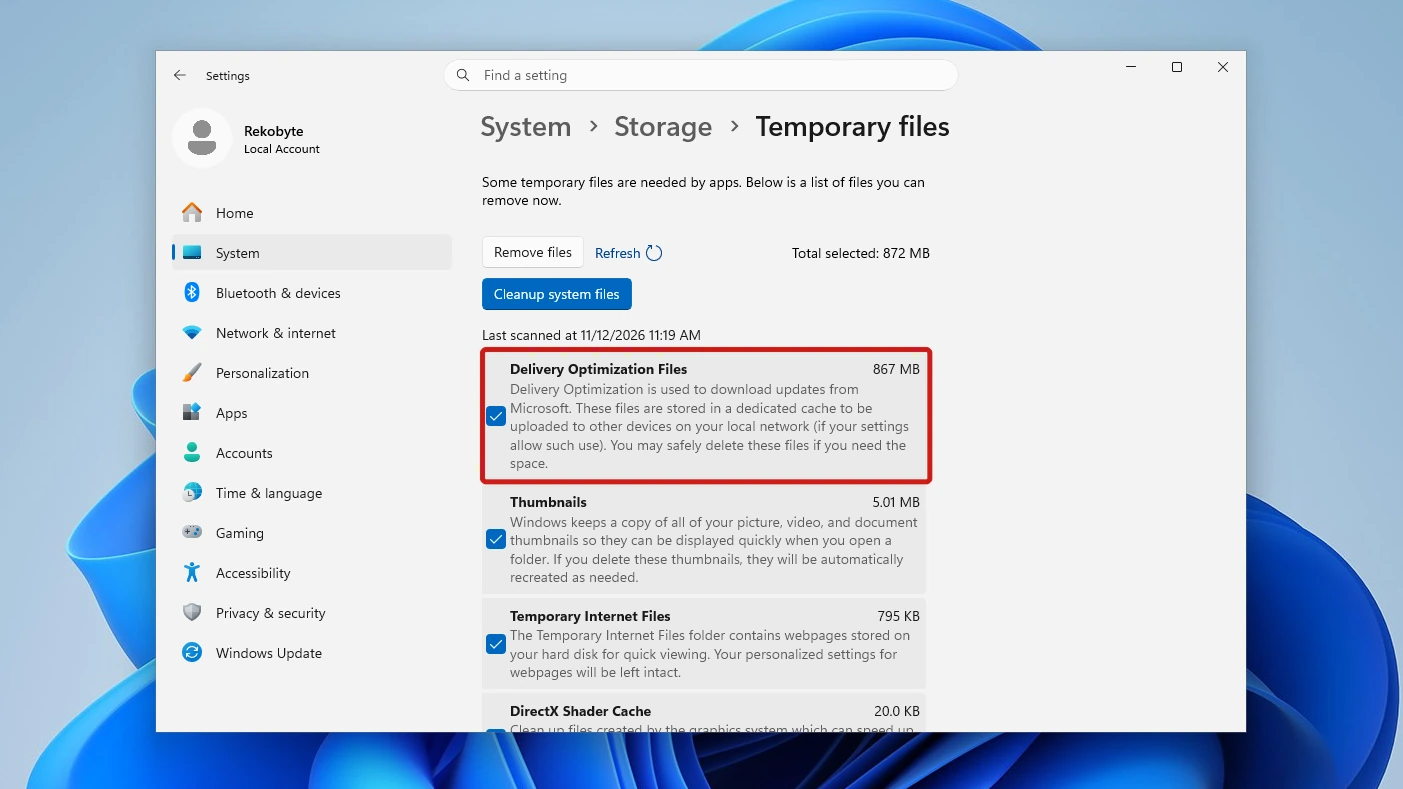
- Leave that row ticked and untick the others if you want only this cache gone. Settings ticks the first four rows (Delivery Optimization, Thumbnails, Temporary Internet Files and DirectX Shader Cache) by default, and Total selected at the top changes as you untick them.
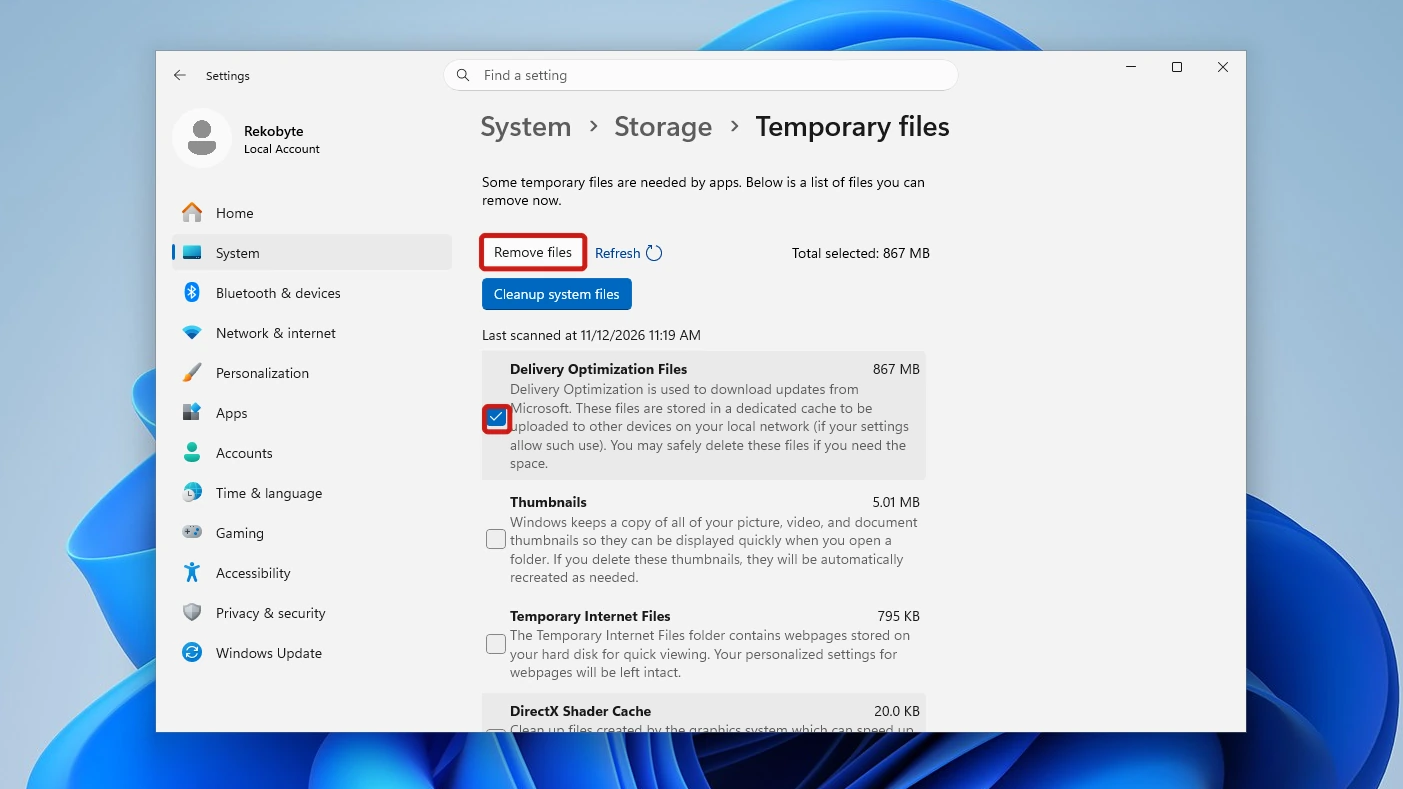
- Click Remove files. A Remove files dialog says “The selected files and their data will be permanently deleted.”
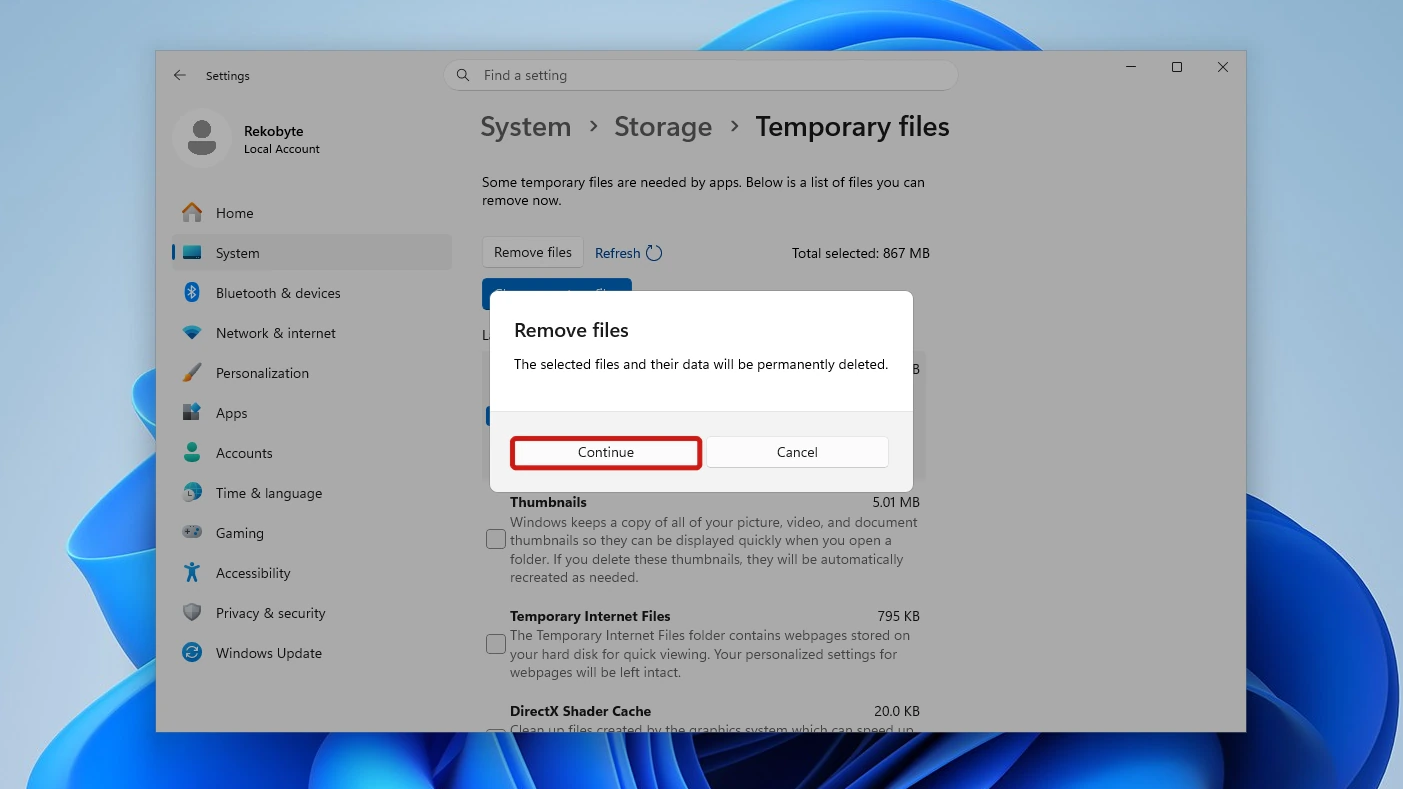
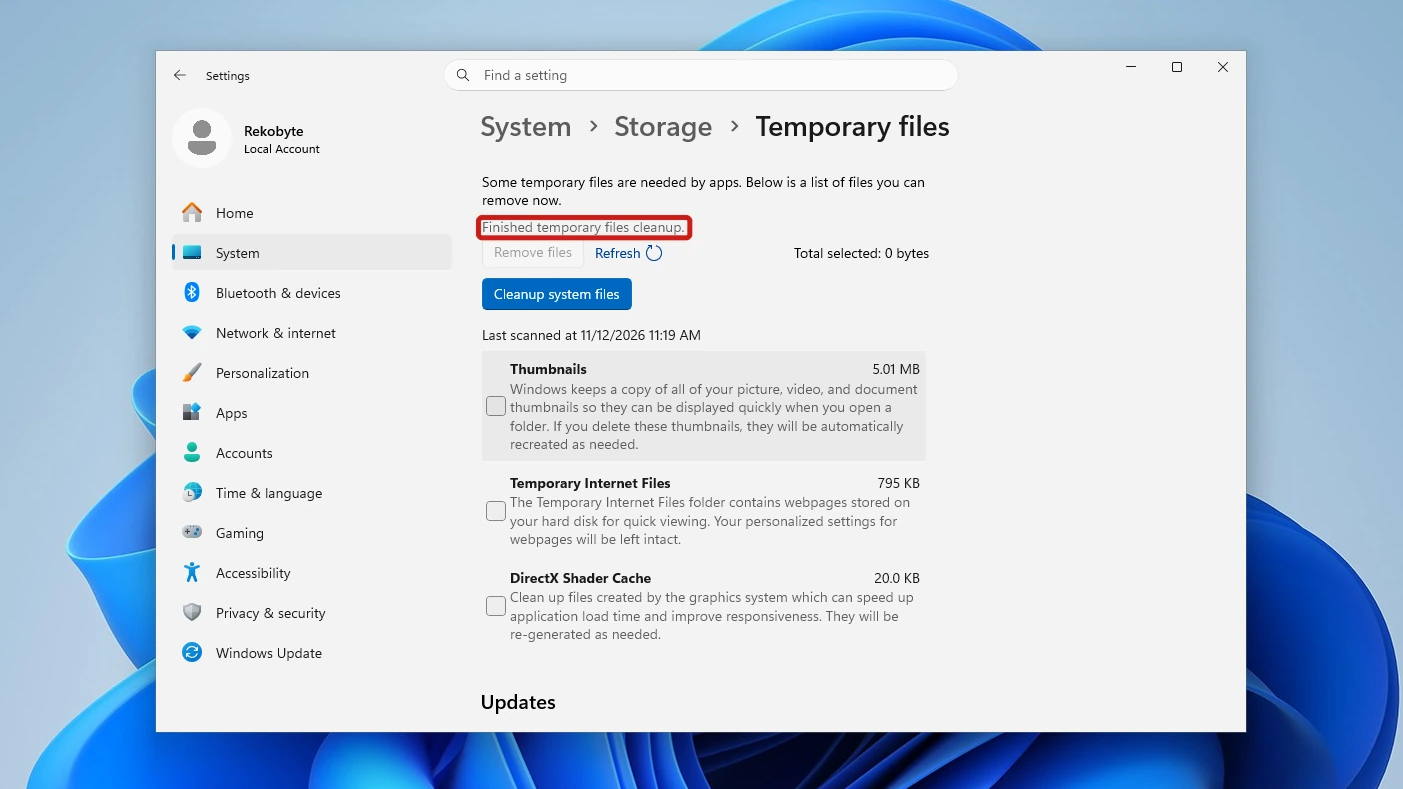
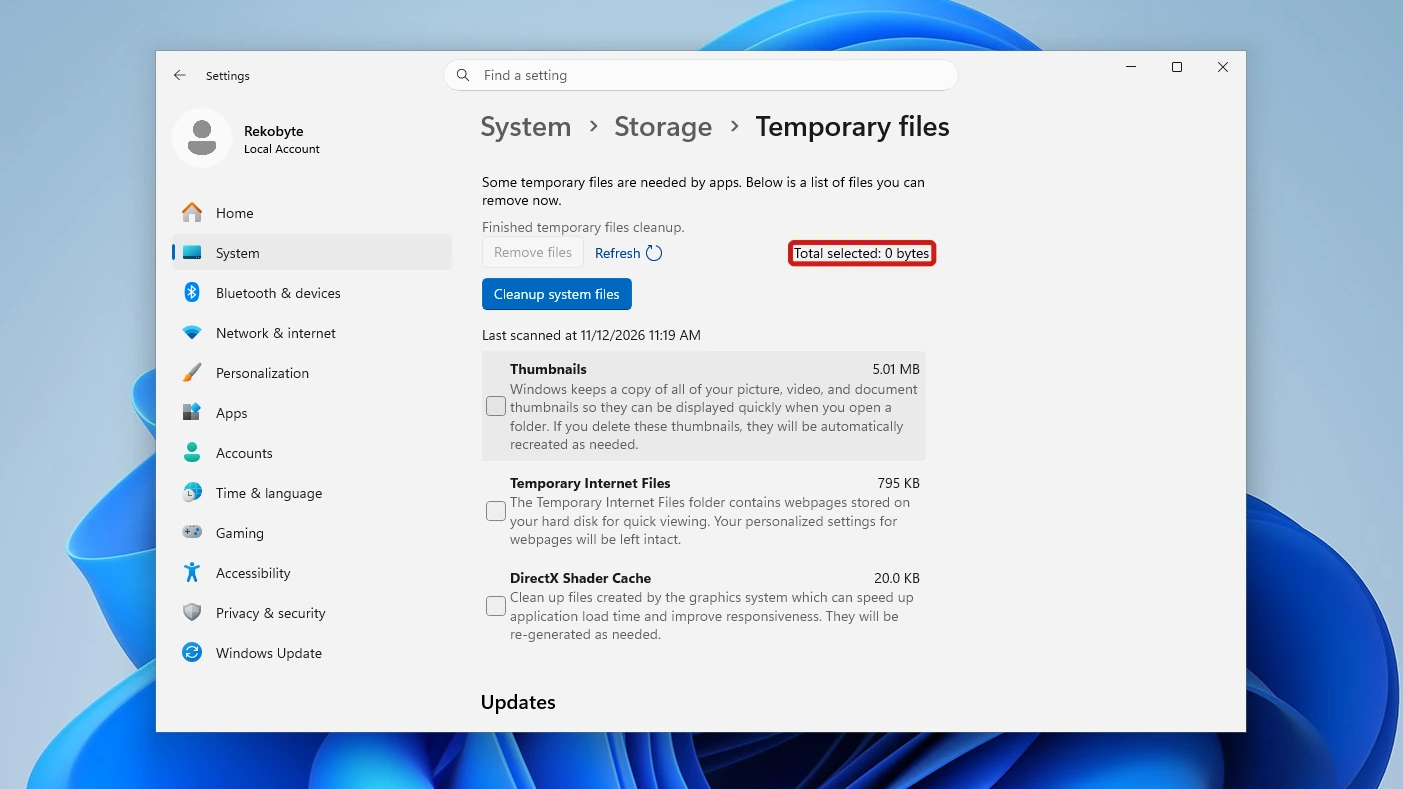
- Click Continue and wait about three seconds. The page shows “Finished temporary files cleanup.”, Total selected drops to 0 bytes and the row disappears. Settings does not show how much was freed.
Method 2: Remove Delivery Optimization Files With Disk Cleanup
Delivery optimization files in Disk Cleanup are unticked by default, unlike in Settings, so you tick the row yourself.
- Press Windows key + R, run the command below and click OK. The Disk Cleanup for (C:) window opens. If you cannot see the row, click Clean up system files first; on one of our runs the window opened with that button and a short list.
cleanmgr /d C:
- Scroll the Files to delete list one notch and tick the Delivery Optimization row. The window is a fixed size, and the row did not appear until we scrolled. With only that row ticked, Total amount of disk space you gain matched its size (2.11 GB in one run; the cache was smaller in others, so your figure will differ).
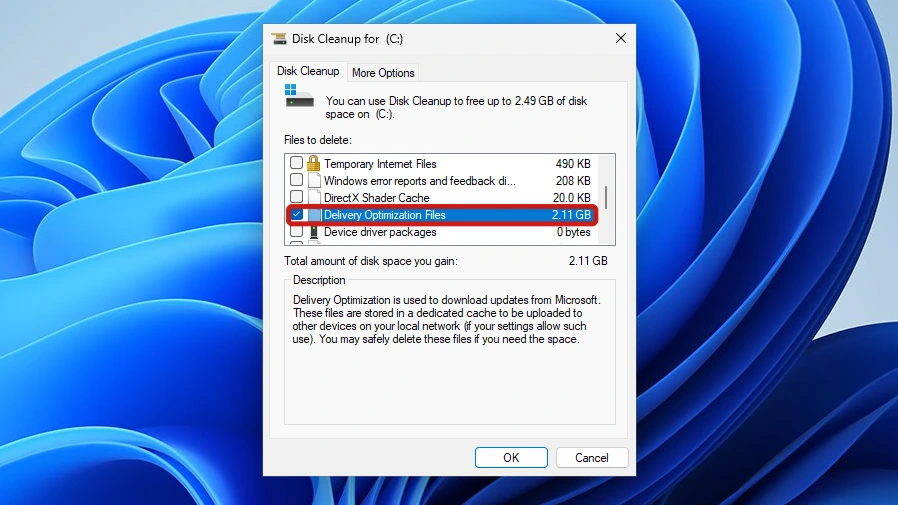
- Click OK, then Delete Files when Disk Cleanup asks “Are you sure you want to permanently delete these files?” The window closes after about eight seconds with no completion message.
Method 3: Clear the Delivery Optimization Cache With PowerShell
Microsoft’s monitoring page documents the cmdlet that clears the cache, and a before and after size check shows the result. Microsoft documents Windows PowerShell as administrator as the route. On a standard account the UAC prompt can block that, and the commands also ran in a plain Windows PowerShell window in our runs.
- Search for Windows PowerShell, right-click it and choose Run as administrator. In the screenshot the title bar reads “Administrator: Windows PowerShell”.
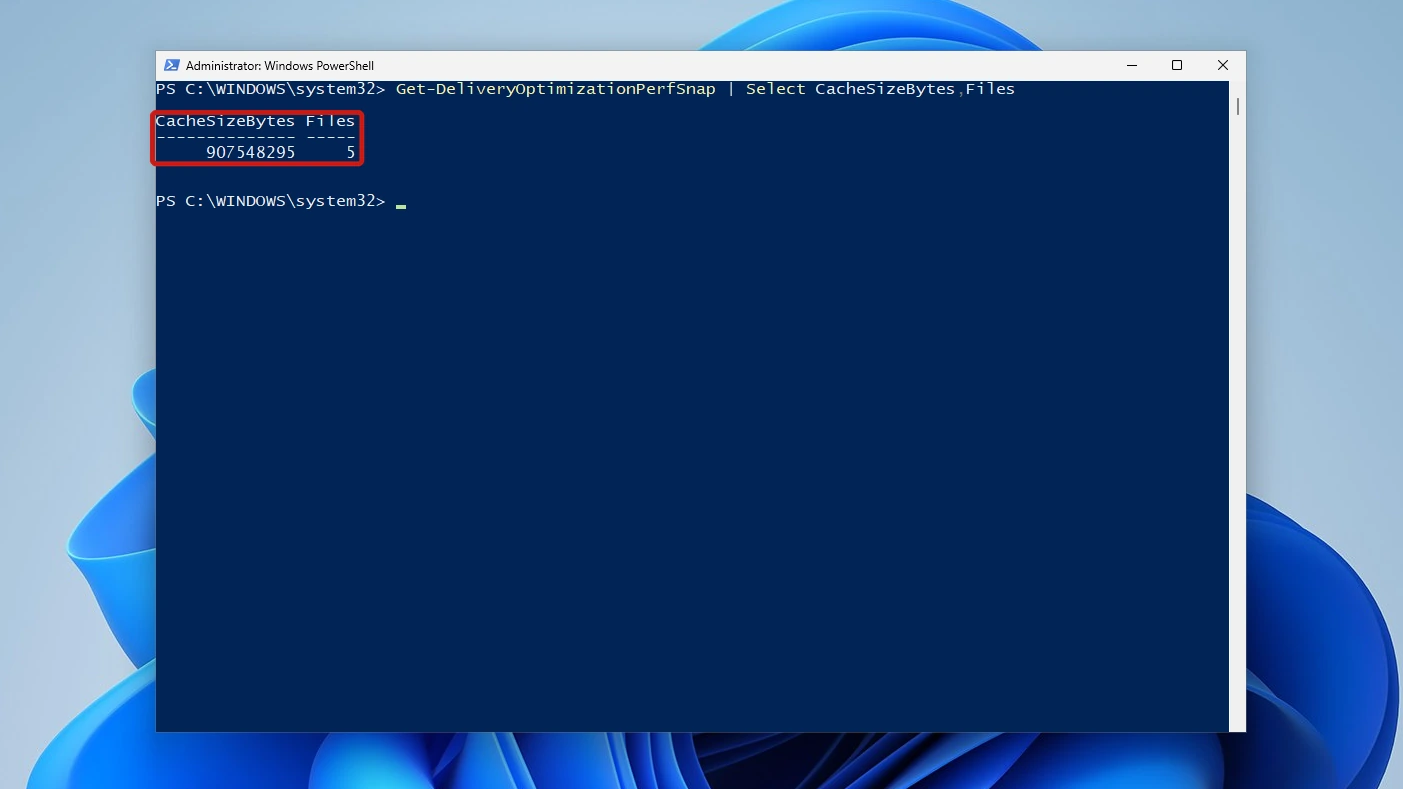
- Check the cache size first by running this command. CacheSizeBytes is the space the cache occupies and Files is how many files it holds. Our run showed 907548295 bytes (865 MiB) and 5 files; another run showed 971511431 bytes. Sizes matched across Settings, Disk Cleanup and PowerShell while the cache held data.
Get-DeliveryOptimizationPerfSnap | Select CacheSizeBytes,Files
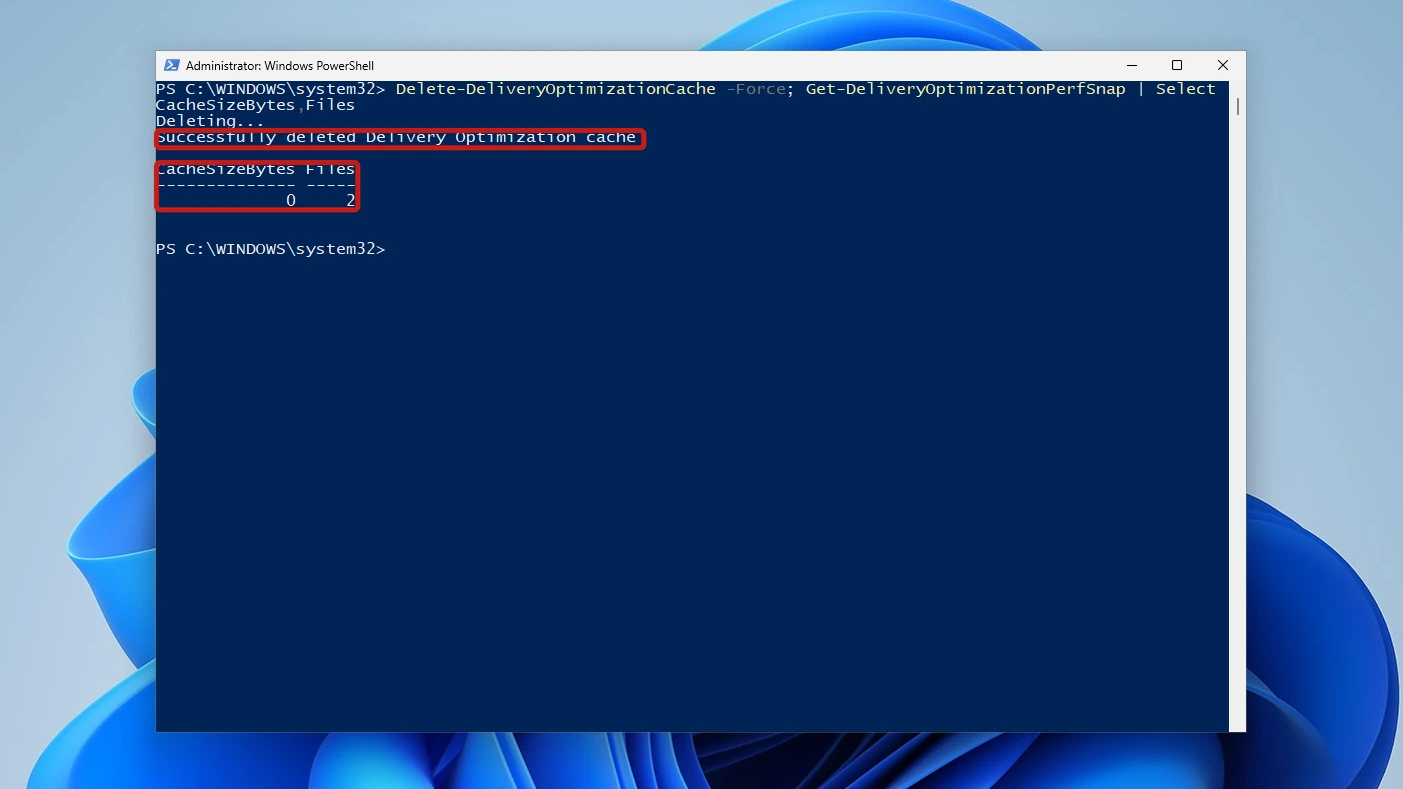
- Clear the cache and check again by running both commands together. -Force skips the prompt. Without it PowerShell asks “Are you sure you want to delete files in Delivery Optimization Cache? You cannot undo this action.” and cancels unless you press Y. The output reads “Successfully deleted Delivery Optimization cache”, and CacheSizeBytes falls to 0. Files did not reach 0 (it showed 2) while Windows kept downloading.
Delete-DeliveryOptimizationCache -Force; Get-DeliveryOptimizationPerfSnap | Select CacheSizeBytes,Files
Note: There is no Clear-DeliveryOptimizationCache cmdlet. Get-Command *DeliveryOptimization* on ours listed seven functions and two cmdlets, and none starts with Clear-. Add -IncludePinnedFiles to Delete-DeliveryOptimizationCache only if you pinned files with Set-DeliveryOptimizationStatus.
Where the Delivery Optimization Cache Folder Lives
Get-DOConfig -Verbose reports the cache folder as its WorkingDirectory, which on ours was:
C:\Windows\ServiceProfiles\NetworkService\AppData\Local\Microsoft\Windows\DeliveryOptimization\Cache
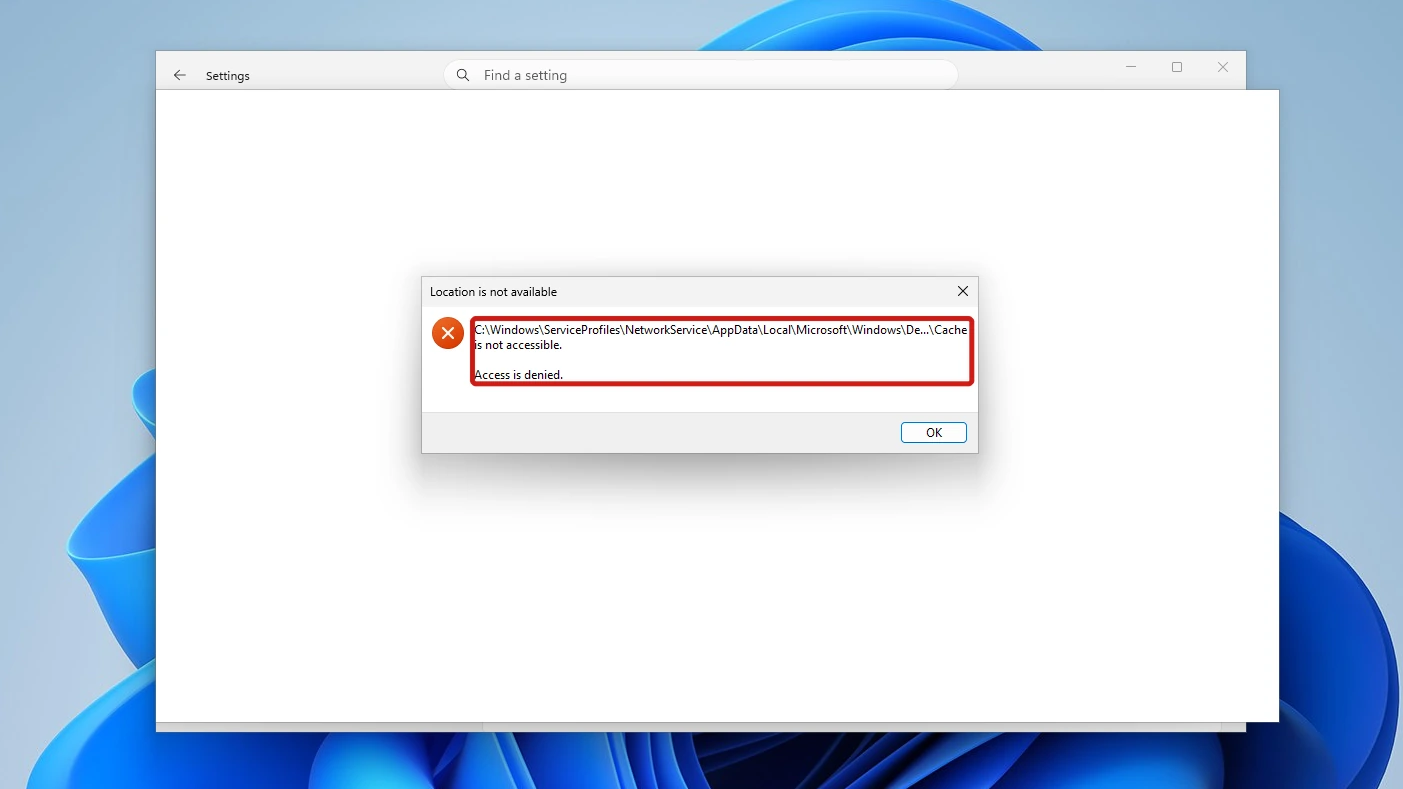
Microsoft’s reference says the cache sits on the operating system drive by default, and a Group Policy setting called Modify cache drive can move it. Use the three methods above rather than deleting from this folder yourself. File Explorer refuses a normal account: it shows “Location is not available” with “Access is denied.” Only SYSTEM, Administrators and NETWORK SERVICE have access to the folder.
What Happens After You Delete Delivery Optimization Files
Delivery Optimization starts caching again as soon as new downloads arrive. The Delivery Optimization reference lists these policy defaults:
| Setting | Default |
|---|---|
| Maximum cache age | 3 days (259,200 seconds); 0 means unlimited, cleaned as needed |
| Maximum cache size | 20 percent of available drive space |
| Absolute maximum cache size | Not configured; if set, it overrides the percentage |
On ours, Get-DeliveryOptimizationStatus showed ExpireOn exactly three days after each download, and the cache held a few files after each clearing. The guide to keeping Windows 11 updated shows Windows Update’s active hours and how to pause updates.
Stop Delivery Optimization Files From Being Shared
Delivery optimization files exist partly so your PC can share downloads with other devices, and the sharing switch is the setting that stops it. Microsoft’s Delivery Optimization page covers the switch and the bandwidth limits beside it. The Delivery Optimization page in Settings has no switch for the cache itself.
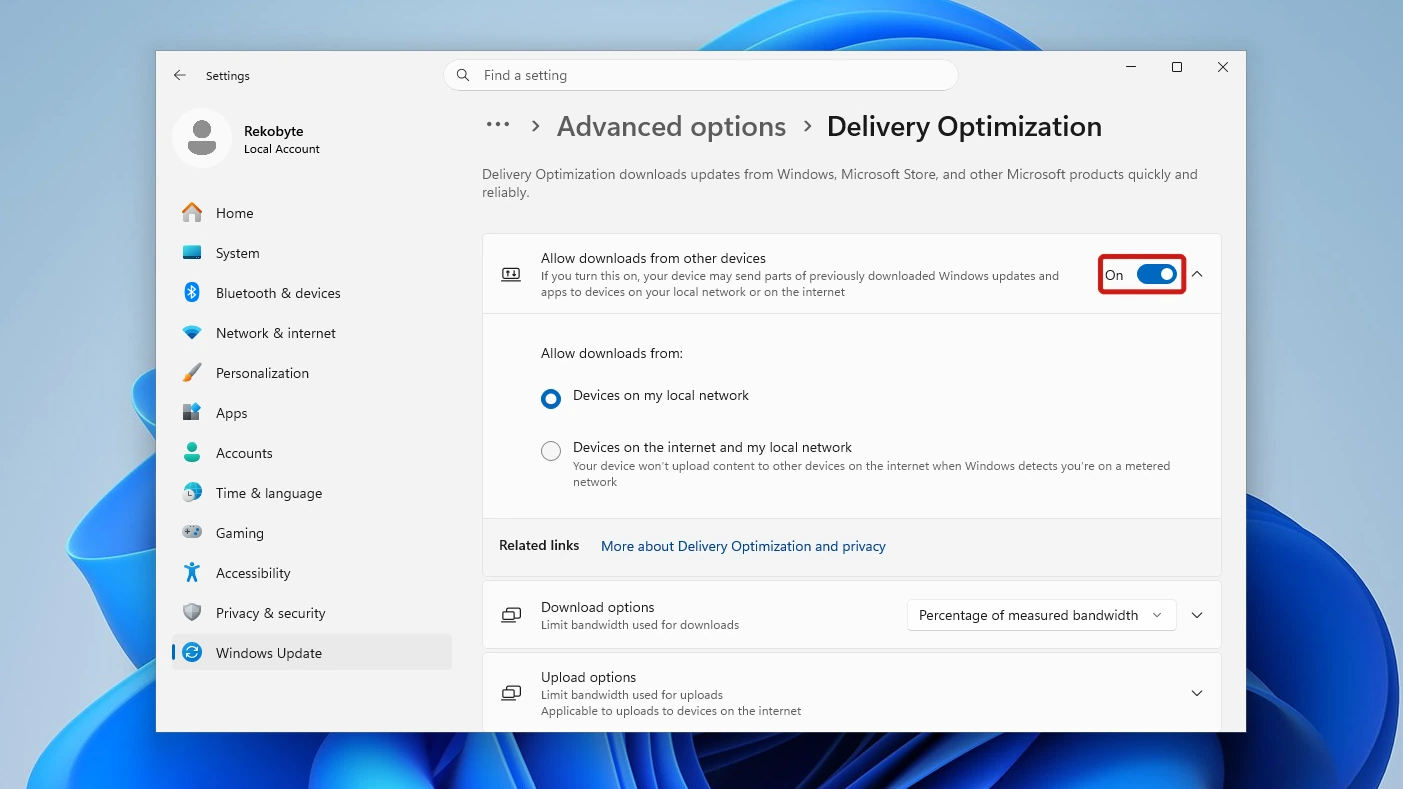
- Open Settings, go to Windows Update > Advanced options and click Delivery Optimization under Additional options.
- Switch Allow downloads from other devices to Off. It reads On by default on our Pro test PC, with Devices on my local network selected underneath. Its on-screen text reads “If you turn this on, your device may send parts of previously downloaded Windows updates and apps to devices on your local network or on the internet”. Microsoft’s page calls the Windows 10 version “Allow downloads from other PCs”.
Why the Delivery Optimization Files Row Is Missing
If the row is missing, the cache is probably empty. After Method 1 ours dropped the row altogether, and Thumbnails became the first entry.
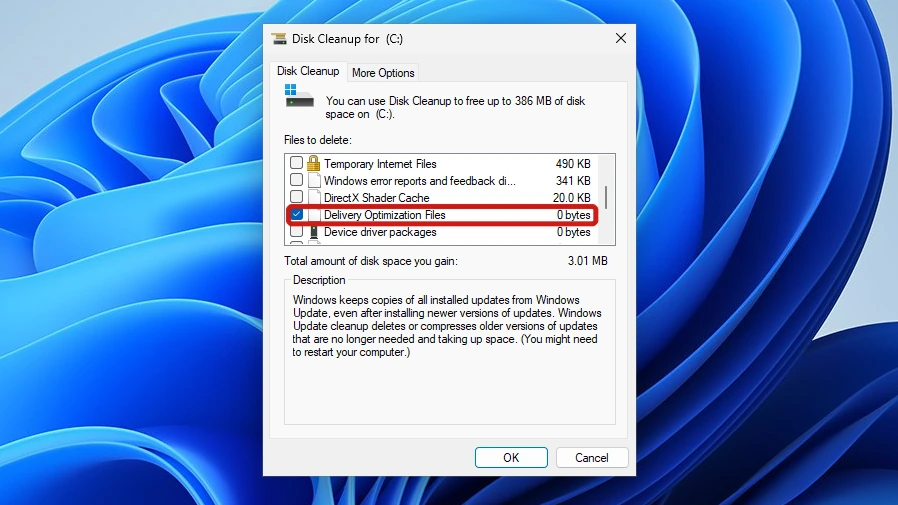
Disk Cleanup behaves differently. When we opened it again after clearing, the row stayed listed at “0 bytes”.
Conclusion
Yes, delivery optimization files are safe to delete. Microsoft’s own row description says “You may safely delete these files if you need the space.” Open Settings > System > Storage > Temporary files, tick the first row and click Remove files.
Video Guide
Watch each method run on screen, from the Settings row to the PowerShell size check.


Trade-off: The switch is about sharing downloads with other devices. Microsoft’s page does not say it clears the cache and we did not switch it off, so deleting the files is the method we showed for reclaiming space.