Your C: drive is running low, a disk analyzer shows a huge WinSxS entry, and you want to know whether it is safe to delete the WinSxS folder in Windows 11. It is not: Microsoft warns that deleting it can leave your PC unable to boot or update, and Windows has its own tools to shrink it. We measured it and ran Disk Cleanup and DISM on a Windows 11 PC on build 26300.
This guide explains what the WinSxS folder does and why File Explorer’s number for it can mislead you. Then it shows how to measure the space it really takes, clean it up two safe ways, and spot the one command you can’t take back.
What Is the WinSxS Folder?
The WinSxS folder holds the Windows component store, which Windows uses to install updates, turn features on or off, recover from corruption or boot failures, and uninstall problem updates. It sits here:
C:\Windows\WinSxS
It isn’t hidden, so it shows in C:\Windows with hidden items turned off. The owner is TrustedInstaller, and on the PC we tested even administrators could only read it.
It is also not the update cache, which Windows keeps in a different folder called SoftwareDistribution, and it is not Windows.old.
Is It Safe to Delete the WinSxS Folder?
No. Microsoft’s cleanup page warns: “Deleting files from the WinSxS folder or deleting the entire WinSxS folder may severely damage your system so that your PC might not boot and make it impossible to update.” Some important system files are stored only there, according to Microsoft’s page on measuring the folder.
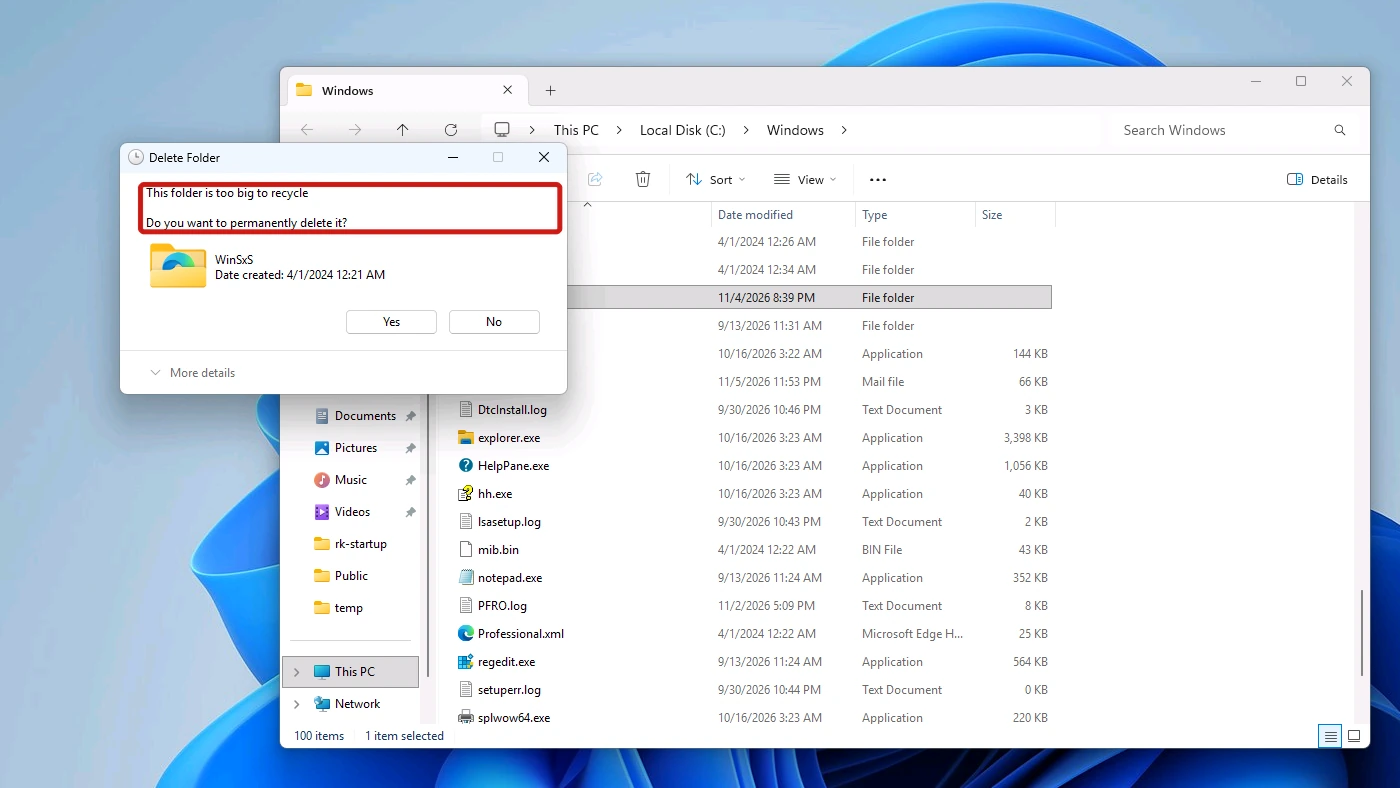
Heads up: Windows does not stop you at the first step. On our test PC, pressing Delete on the folder spent about three minutes counting 141,609 items (15.4 GB), then showed “This folder is too big to recycle” and “Do you want to permanently delete it?” Click No. We clicked No and the folder stayed intact.
Why Is the WinSxS Folder So Big in File Explorer?
File Explorer sizes the WinSxS folder without accounting for hard links, so it counts files that appear in more than one place in Windows as if each copy took up space. There is usually only one copy of such a file, and the rest are hard links.
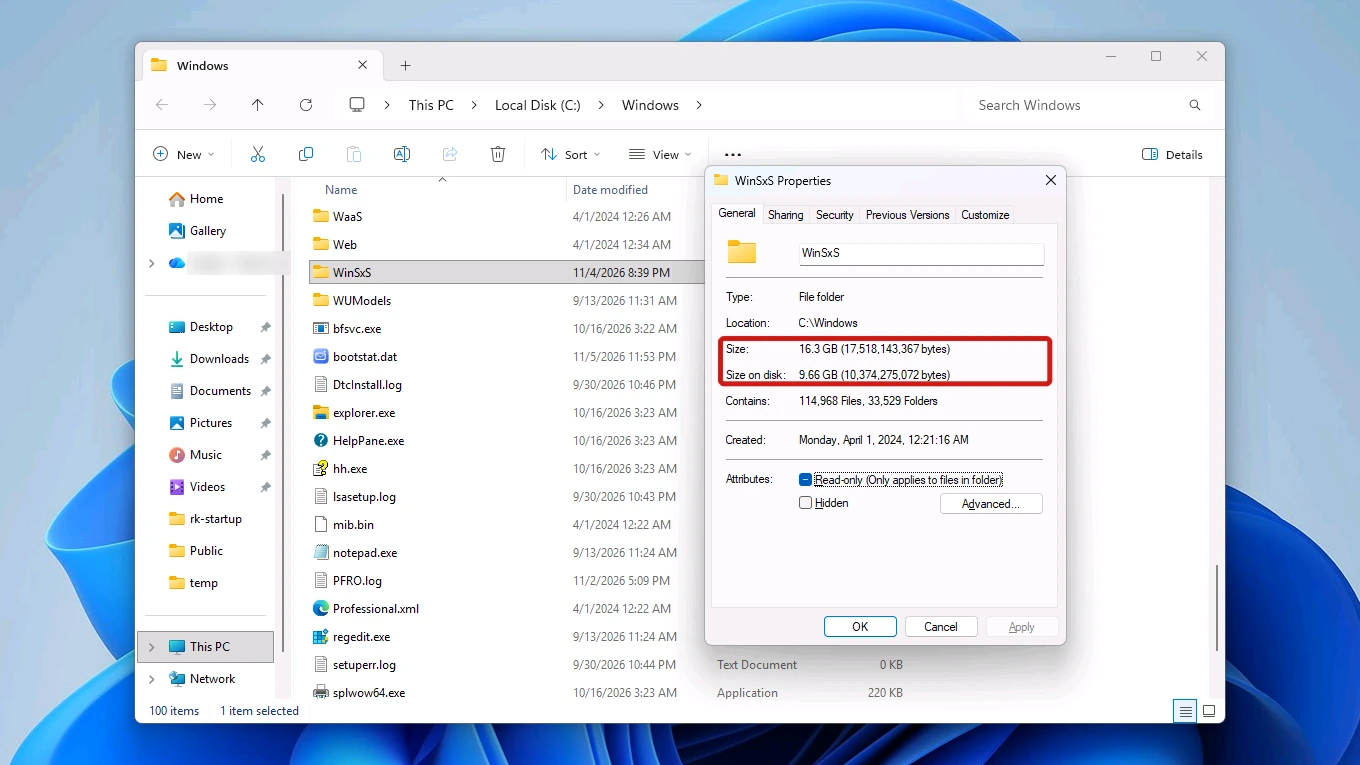
Even File Explorer’s own two numbers disagreed when we checked. The folder’s Properties window showed a Size of 16.3 GB but a Size on disk of 9.66 GB, across 114,968 files in 33,529 folders.
DISM, covered next, accounts for hard links and put the actual size at 9.85 GB. Of that, 4.32 GB is shared with Windows itself, and those files are needed for Windows to run, so they are not space you can win back.
How to Check the Real Size of the WinSxS Folder
DISM measures it properly, but it needs a Command Prompt with administrator rights. Press the Windows key, type cmd, choose Run as administrator and approve the UAC prompt. Then run this command:
Dism.exe /Online /Cleanup-Image /AnalyzeComponentStore
The analysis took about 52 seconds on the same PC.
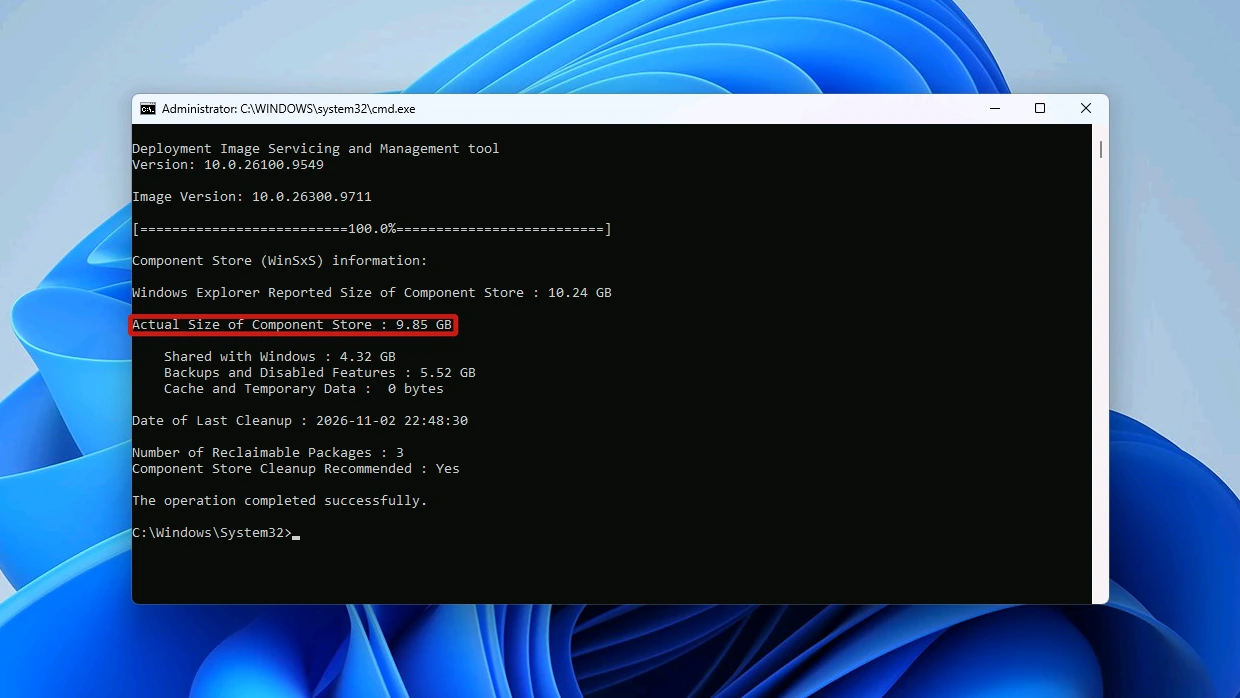
Here is what each line of the report means, using Microsoft’s definitions, next to the numbers we got:
| Field | What it means (Microsoft) | Our test PC |
|---|---|---|
| Windows Explorer Reported Size of Component Store | Does not factor in hard links | 10.24 GB |
| Actual Size of Component Store | Factors in hard links and includes files shared with Windows | 9.85 GB |
| Shared with Windows | Hard-linked files that are not overhead | 4.32 GB |
| Backups and Disabled Features | Part of the overhead | 5.52 GB |
| Cache and Temporary Data | Part of the overhead | 0 bytes |
| Number of Reclaimable Packages | Superseded packages that cleanup can remove | 3 |
| Component Store Cleanup Recommended | Whether a cleanup is recommended | Yes |
The Explorer-reported figure here won’t match the Properties window (10.24 GB against 16.3 GB for us); the Actual Size row is the one that counts. Add Backups and Disabled Features to Cache and Temporary Data and you get the overhead: 5.52 GB on this PC.
How to Clean Up the WinSxS Folder in Windows 11
The fix Microsoft gives is to shrink the folder with cleanup tools built into Windows, not to delete it.
Try Method 1 first, because it needs no commands. Method 2 is the command-line route, and Windows also runs a cleanup task of its own on a schedule.
Method 1: Run Windows Update Cleanup in Disk Cleanup
Disk Cleanup has an option that clears out old updates, and Microsoft’s cleanup page says it reduces the size of the component store.
- Press Windows key + R, type cleanmgr /d C and press Enter. Disk Cleanup opens straight on drive C:, so there is no drive to pick.
- Select Clean up system files and approve the UAC prompt to add the system items to the list.
- Tick Windows Update Cleanup, which is not ticked by default. It listed 570 MB for us. Downloaded Program Files, Temporary Internet Files and Thumbnails start ticked, so untick them if you only want this one.
- Select OK, then Delete Files when asked “Are you sure you want to permanently delete these files?”
- Wait for the “Cleaning: Windows Update Cleanup” progress window to close. It took about 27 minutes on our test PC.
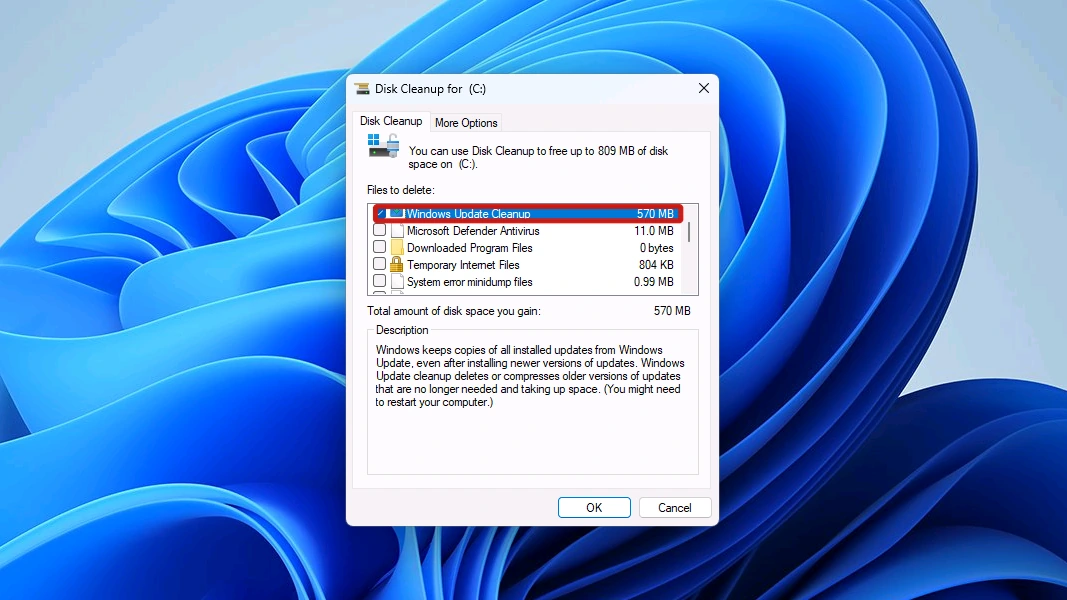
The item’s description reads: “Windows keeps copies of all installed updates from Windows Update, even after installing newer versions of updates. Windows Update cleanup deletes or compresses older versions of updates that are no longer needed and taking up space. (You might need to restart your computer.)” Ours did not ask us to restart.
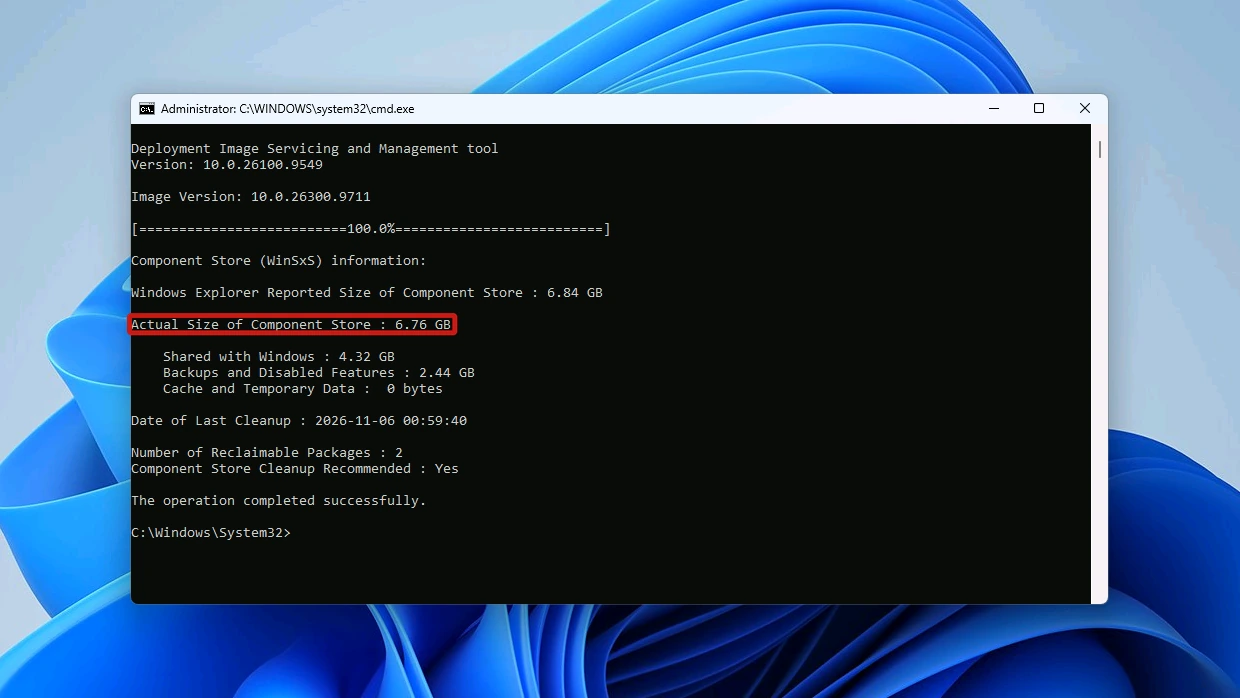
Running the DISM analysis again afterwards put the component store at 6.76 GB, down from 9.85 GB. That is about 3.1 GB freed, more than the 570 MB Disk Cleanup listed, and Backups and Disabled Features fell from 5.52 GB to 2.44 GB. Treat that as one PC’s result, not a promise for yours.
Method 2: Run DISM StartComponentCleanup
Open an administrator Command Prompt the same way as for the size check, then run:
Dism.exe /online /Cleanup-Image /StartComponentCleanup
It works like Windows’ scheduled cleanup task, with two differences: previous versions of updated components are deleted immediately, without a 30-day grace period, and there is no 1-hour time limit. The DISM servicing options page describes it as cleaning up superseded components to reduce the size of the component store.
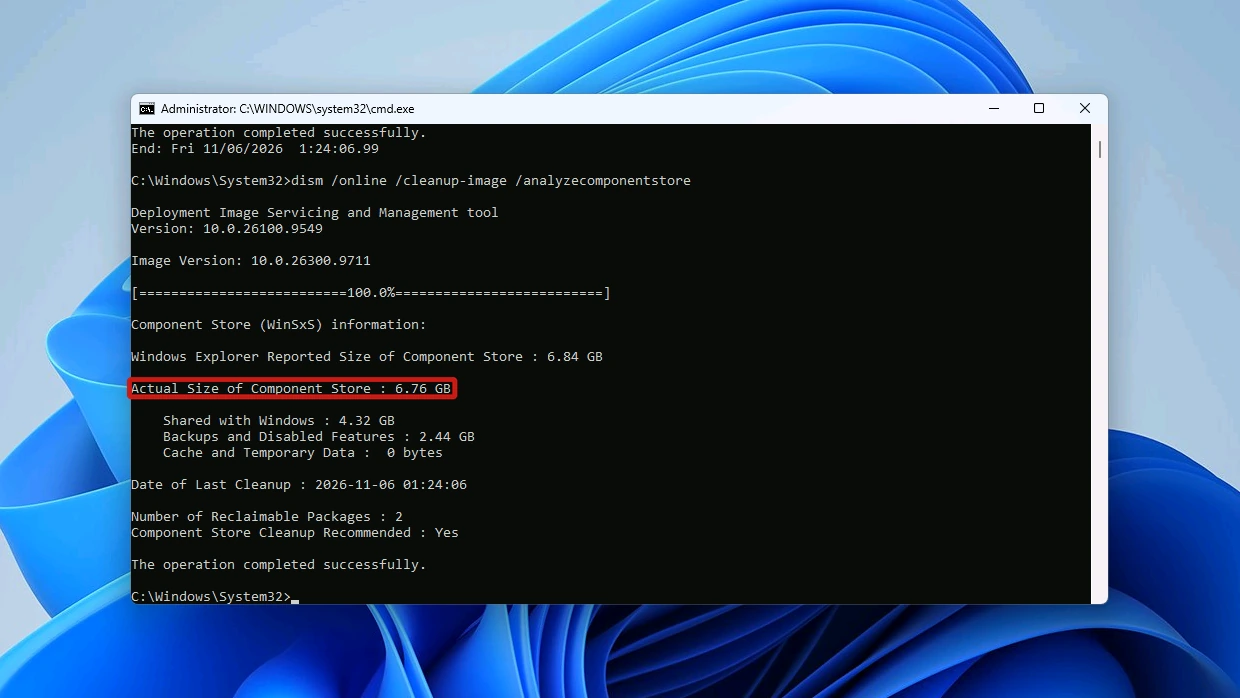
We ran it after Disk Cleanup. It finished in about 2 seconds with “The operation completed successfully.”, and the analysis afterwards still showed 6.76 GB, so it freed nothing more for us.
Let the Built-In Cleanup Task Do It
Windows runs a task called StartComponentCleanup on its own when the PC isn’t in use, and it waits at least 30 days after an updated component is installed before removing the previous versions. It last ran on November 2 here, the same date DISM gave as the Date of Last Cleanup. In Task Scheduler it sits under Task Scheduler Library > Microsoft > Windows > Servicing, and you can start it now with this command:
schtasks.exe /Run /TN "\Microsoft\Windows\Servicing\StartComponentCleanup"
Run by hand, the task stops after an hour and may not clean up everything. Microsoft strongly recommends not disabling it.
Should You Use DISM /ResetBase?
Only if you accept that you can no longer uninstall any update that is already installed. The command adds one switch to Method 2:
Dism.exe /online /Cleanup-Image /StartComponentCleanup /ResetBase
This can’t be reversed. “All existing update packages can’t be uninstalled after this command is completed, but this won’t block the uninstallation of future update packages,” says Microsoft’s cleanup page.
It removes all superseded versions of every component in the store. We did not run it, because it cannot be undone.
What If Cleanup Frees Little or Nothing?
It can happen. On our test PC, 2 reclaimable packages were still listed after both methods, and the report still recommended a cleanup. Two lines in the AnalyzeComponentStore report point to what to try next:
- Date of Last Cleanup: if no cleanup has run recently, start the built-in task by hand with the schtasks command above.
- Number of Reclaimable Packages: if packages are still left after Methods 1 and 2, /ResetBase is the stronger option, but it is one-way (see the section above).
If DISM or Windows Update stops with an error code, look the code up in our Windows error code lookup to see what it means before you try again.
Restore points are another separate item. They sit in the hidden System Volume Information folder, and our System Volume Information guide shows how to measure and cap them without deleting the folder.
Windows.old is a separate item. If you upgraded fewer than 10 days ago, the previous version of Windows is listed as a system file you can delete, and Microsoft’s drive space page spells out the cost: deleting it removes Windows.old, can’t be undone, and ends your option to go back.
For everyday space, Storage Sense and the standard Disk Cleanup list are walked through in our guide to keeping Windows 11 updated, so this page does not repeat them.
Conclusion
No, don’t delete the WinSxS folder or anything inside it in Windows 11: Microsoft warns your PC might not boot or update. File Explorer overstates its size; DISM’s AnalyzeComponentStore report shows the true figure, including files Windows itself needs. To shrink it safely, run Windows Update Cleanup in Disk Cleanup or DISM StartComponentCleanup, and treat /ResetBase as one-way.
Check the real size with DISM before you start and again afterwards to see what the cleanup freed. On our test PC, Disk Cleanup alone freed about 3.1 GB.