
You are freeing up space in Disk Cleanup or Settings and find a box labeled DirectX Shader Cache. It is OK to delete: the graphics code it holds is rebuilt as you use your games and apps, and the one real cost is that each of them opens more slowly the first time. We cleared it on a stock Windows 11 PC with both built-in tools to check each step of both methods.
We start with what the DirectX Shader Cache is and where Windows keeps it, then cover the two ways to clear it, what happens the next time you open a game, when clearing it actually helps, and the separate shader caches NVIDIA and AMD keep.
What Is the DirectX Shader Cache?
The DirectX Shader Cache is where Windows stores graphics code that has already been compiled, so apps and games can skip that work the next time they run. Shaders are pieces of graphics code, and they have to be compiled before an app can use them.
Microsoft’s documentation says the Direct3D drivers can support an “OS-managed shader cache that stores compiled shaders on disk to accelerate future runs of the application”. Microsoft’s Direct3D 12 documentation adds that disk-backed shader caches persist from one run to the next unless cleared, and that by default they are stored in temporary storage that “can be cleared by disk cleanup“.
Settings and Disk Cleanup both show this description beside the entry, word for word: “Clean up files created by the graphics system which can speed up application load time and improve responsiveness. They will be re-generated as needed.”
Where the DirectX Shader Cache Is Stored
On a stock Windows 11 PC, we found the cache in a folder named D3DSCache inside your Local AppData folder, holding subfolders with long hexadecimal names. You do not need to touch anything in it, because both methods below clear it for you.
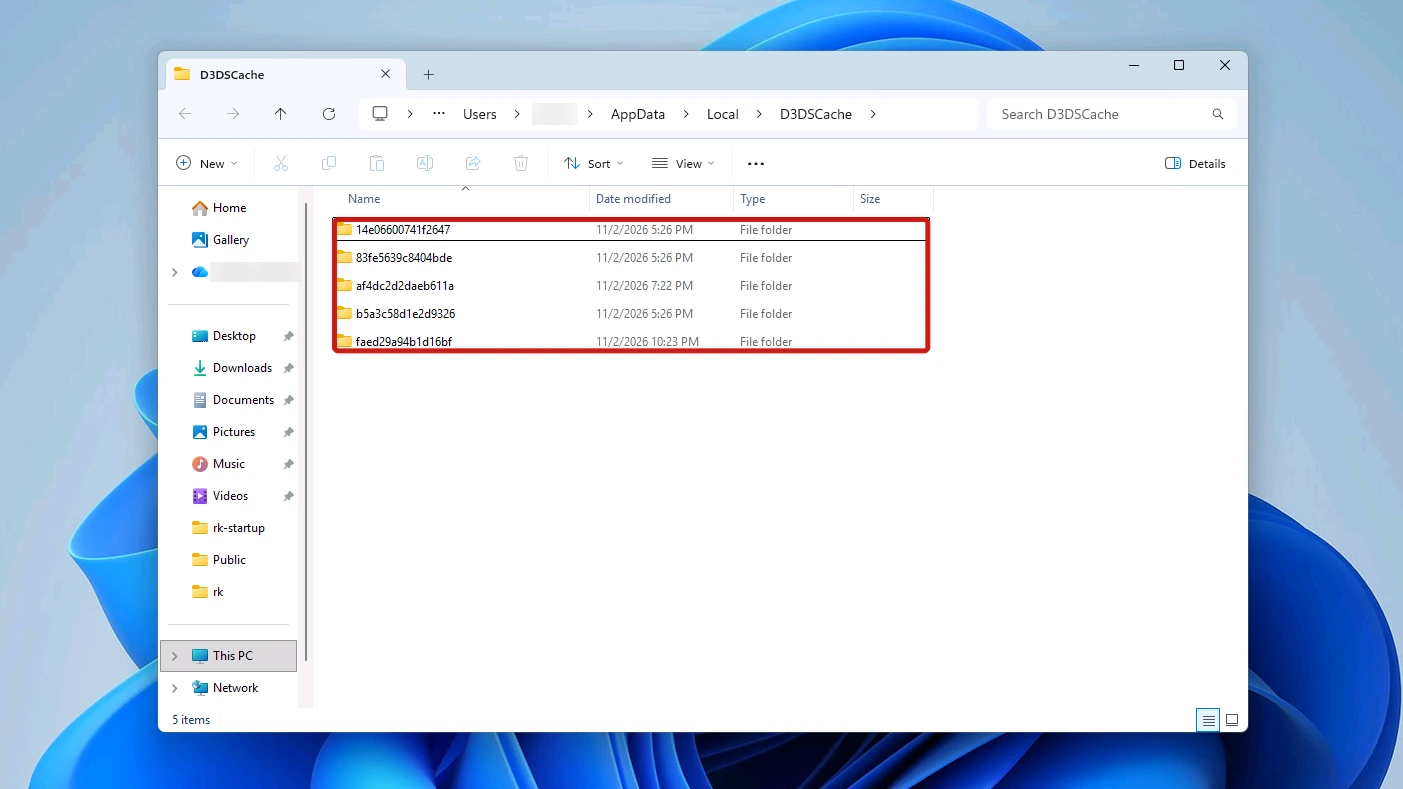
%LocalAppData%\D3DSCache
Paste that into the File Explorer address bar and press Enter to go straight to the folder. It skips the hidden AppData folder you would otherwise have to reveal first. The full path it expands to is:
C:\Users\<YourUsername>\AppData\Local\D3DSCache
Is It Safe to Delete the DirectX Shader Cache?
Yes. It is a cache of compiled shaders, not your files, and Microsoft’s documentation says shader caches live in temporary storage that disk cleanup can clear.
The trade-off is speed. The next launch of each game or app compiles those shaders again, so it opens more slowly, and games can stutter briefly: NVIDIA’s documentation calls shader compiles “a common cause of game-play stuttering”. On Microsoft’s Q&A forum, the accepted answer says you may delete it if it is corrupt or too large and that it fills again, while a second answer suggests keeping it for faster loads.
How much space you get back depends on the PC. On our test PC the entry was 28 KB in both tools. On a second PC we checked, a laptop with an NVIDIA GeForce RTX 2060, the Windows shader cache folder held under 1 MB while NVIDIA’s own shader cache held 5.6 GB. The size Windows lists beside the entry on yours is what clearing it frees.
How to Delete the DirectX Shader Cache in Windows 11
Windows lists the shader cache in two places: the Temporary files page in Settings and the older Disk Cleanup tool. In our test, both showed the entry under the same name, size and description.
Method 1: Clear It From Temporary Files in Settings
Open Start > Settings > System > Storage. The shader cache sits inside the Temporary files row near the top of the page. Cleanup recommendations, further down under Storage management, is a separate page and is not the one you want here.
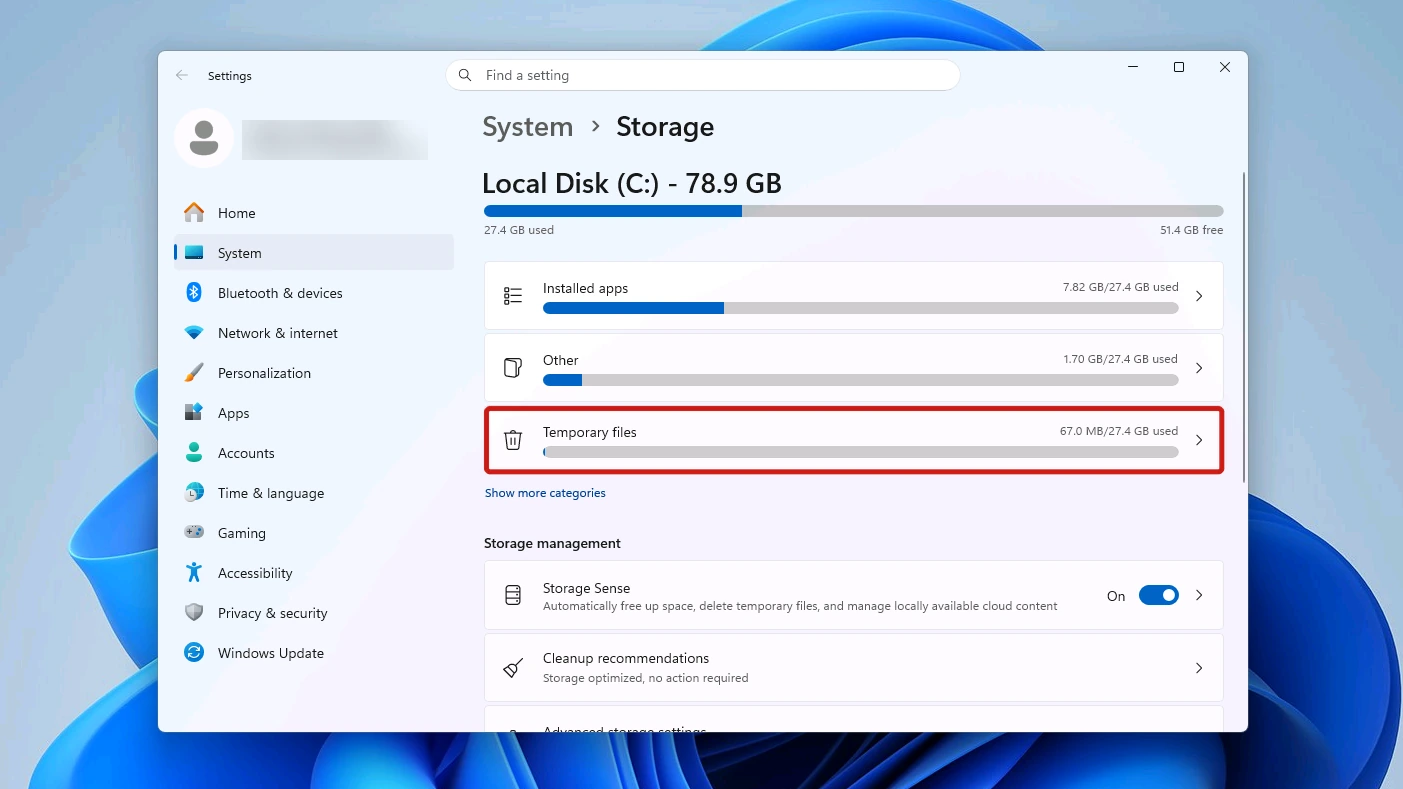
- Click Temporary files on the Storage page. A list of temporary file types opens, with a size beside each one and a Remove files button at the top.
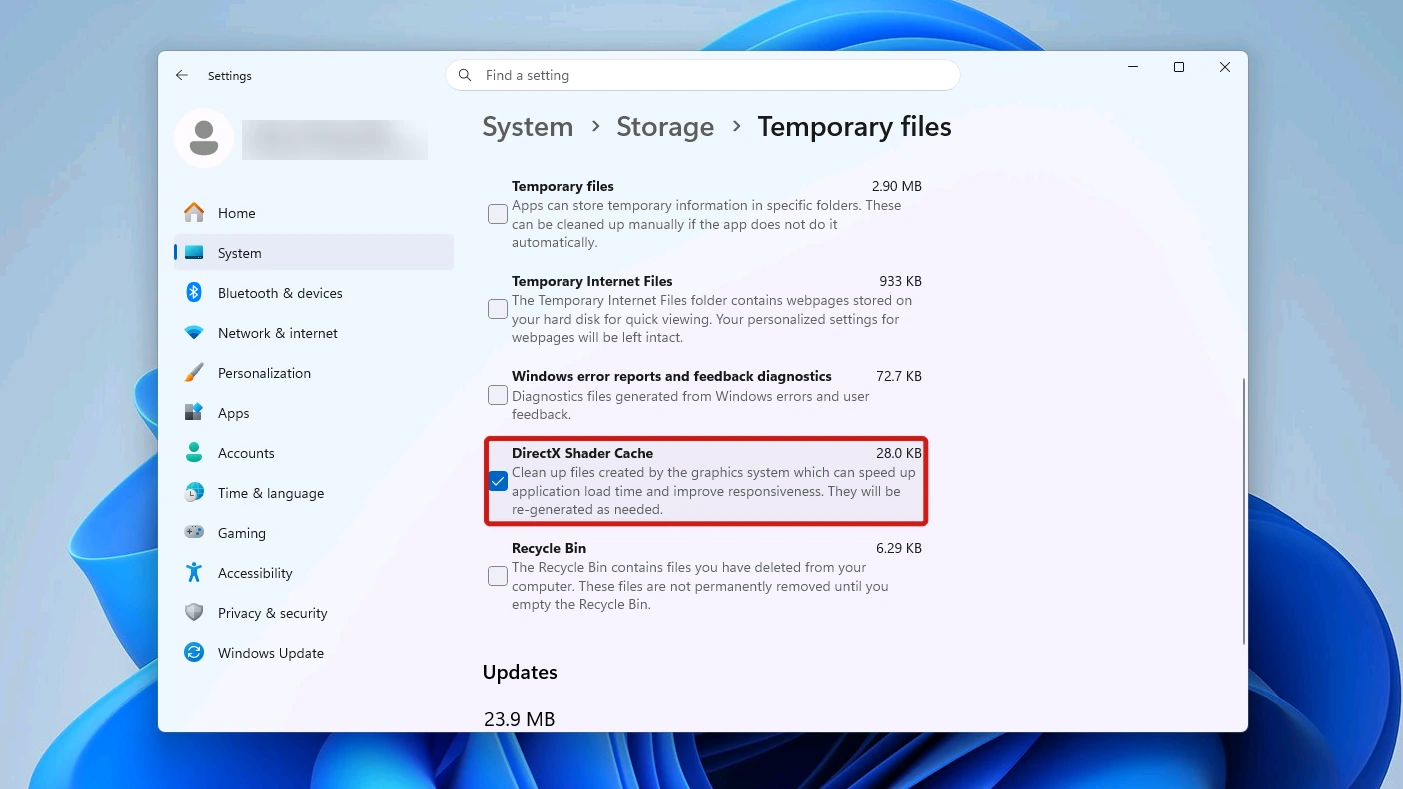
- Untick the entries you want to keep. Several are ticked by default, including Delivery Optimization Files, Thumbnails, Temporary files, Temporary Internet Files and Windows error reports and feedback diagnostics, so untick them if you only want to clear the shader cache.
- Tick DirectX Shader Cache in the list. Total selected at the top updates to include it.
- Click Remove files. A confirmation dialog opens.
- Click Continue in the Remove files dialog. It warns that the selected files and their data will be permanently deleted, which for the shader cache only means your games and apps compile those shaders again later.
When we opened the D3DSCache folder straight afterwards, File Explorer reported that the folder was empty.
Method 2: Clear It With Disk Cleanup
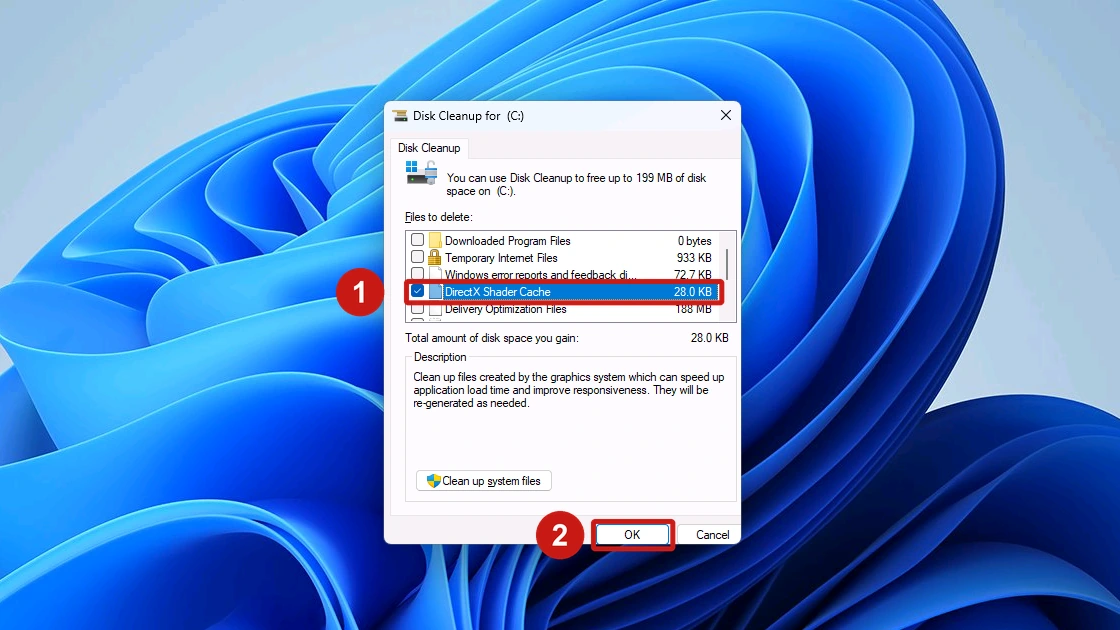
Disk Cleanup lists the same entry under Files to delete, but it leaves it unticked by default. Press the Windows key, type Disk Cleanup and open the first result. If it asks which drive to clean, pick C: and click OK to open Disk Cleanup for (C:).
- Tick DirectX Shader Cache under Files to delete. Several entries, such as Downloaded Program Files and Temporary Internet Files, are ticked by default, so untick them if you only want to clear the shader cache.
- Click OK to start the cleanup. A Disk Cleanup dialog asks, “Are you sure you want to permanently delete these files?”
- Click Delete Files to confirm. Disk Cleanup runs and closes on its own when it finishes.
Disk Cleanup also lists the thumbnail cache, and our guide to clearing the thumbnail cache walks through this same dialog for the Thumbnails entry. It also covers what to do when Windows says those files are in use, which this page does not.
What Happens After You Clear It
Your own files and settings are untouched. The cache itself fills again as you keep using the PC:
- It rebuilds as apps run: each game or app that uses the cache compiles the shaders it needs again, and once they are cached, later runs skip that step and any stutter it caused.
- It refilled without a reboot: the folder was still empty right after we opened Edge, Photos and Calculator. About 75 minutes after the clear, with File Explorer, Settings, Notepad and Command Prompt used since, Disk Cleanup listed the entry at 4 KB. The test PC had no dedicated graphics card, and we ran no games on it.
When Clearing the DirectX Shader Cache Helps
Clearing the cache earns its place when one game is misbehaving, and rarely otherwise.
| Clear it | Leave it |
|---|---|
| A specific game hangs while preparing or compiling shaders. Some game publishers’ support pages suggest clearing shader caches for exactly this. | You want a general speed-up. The cache exists to make loads faster. In another thread on the same forum, the accepted answer says keeping the files speeds up loading and deleting them does not. |
| You need the space, and the entry on your PC is large enough to be worth the recompile. | Nothing is wrong. Another community answer on Microsoft Q&A says that if there was no problem with the cache, you may notice no difference after clearing it. |
If one game keeps misbehaving after you clear the cache, that game publisher’s own support page is the next place to look.
NVIDIA and AMD Keep Their Own Shader Caches
Graphics drivers keep shader caches of their own, separate from the Windows entry covered above. We have not tested whether ticking that entry also clears them. You manage the driver caches from the vendor’s software:
- NVIDIA: in the NVIDIA Control Panel, Manage 3D Settings > Shader Cache Size sets how much disk space the driver may use for compiled shaders: Disabled, Unlimited, or fixed sizes from 128 MB to 100 GB. NVIDIA notes that installing a new driver deletes this cache, so the first run of a game afterwards may stutter. A limit set too small can cause stutter too, because the driver pushes out shaders that are still in use.
- AMD: AMD Software: Adrenalin Edition has a Reset Shader Cache option in the Advanced section of its graphics settings, which deletes all stored shader cache files. AMD says the cache gives faster loading and lower CPU use.
Conclusion
Yes, it is safe to delete the DirectX Shader Cache in Windows 11. It stores compiled graphics code so your apps and games load faster, and it is rebuilt as you use them again. The cost is a slower first launch and some brief stutter in games while that code compiles again.
Clear it when a specific game misbehaves, and leave it alone as routine tidying.