File Explorer showing outdated or incorrect image previews is a common Windows 11 problem. In most cases, the thumbnail cache is to blame. This guide covers four methods to clear and rebuild it, along with an explanation of what the cache is and when clearing it makes sense.
How to Clear and Reset the Thumbnail Cache in Windows 11
There are several ways to clear the thumbnail cache in Windows 11, ranging from a built-in graphical tool to a custom batch file. The options below are ordered from simplest to most advanced. Pick whichever fits your comfort level.
Option 1:
Clear Thumbnail Cache Using Disk Cleanup
Disk Cleanup is the most straightforward method. It’s built into Windows and requires no technical knowledge. It’s also a good way to understand what is thumbnails in disk cleanup: the “Thumbnails” entry refers to the cached preview images Windows stores to speed up folder browsing.
Pro tip: If you accidentally lost some photos, it’s worth opening your Windows thumbnails to see if a smaller version was preserved by the operating system.
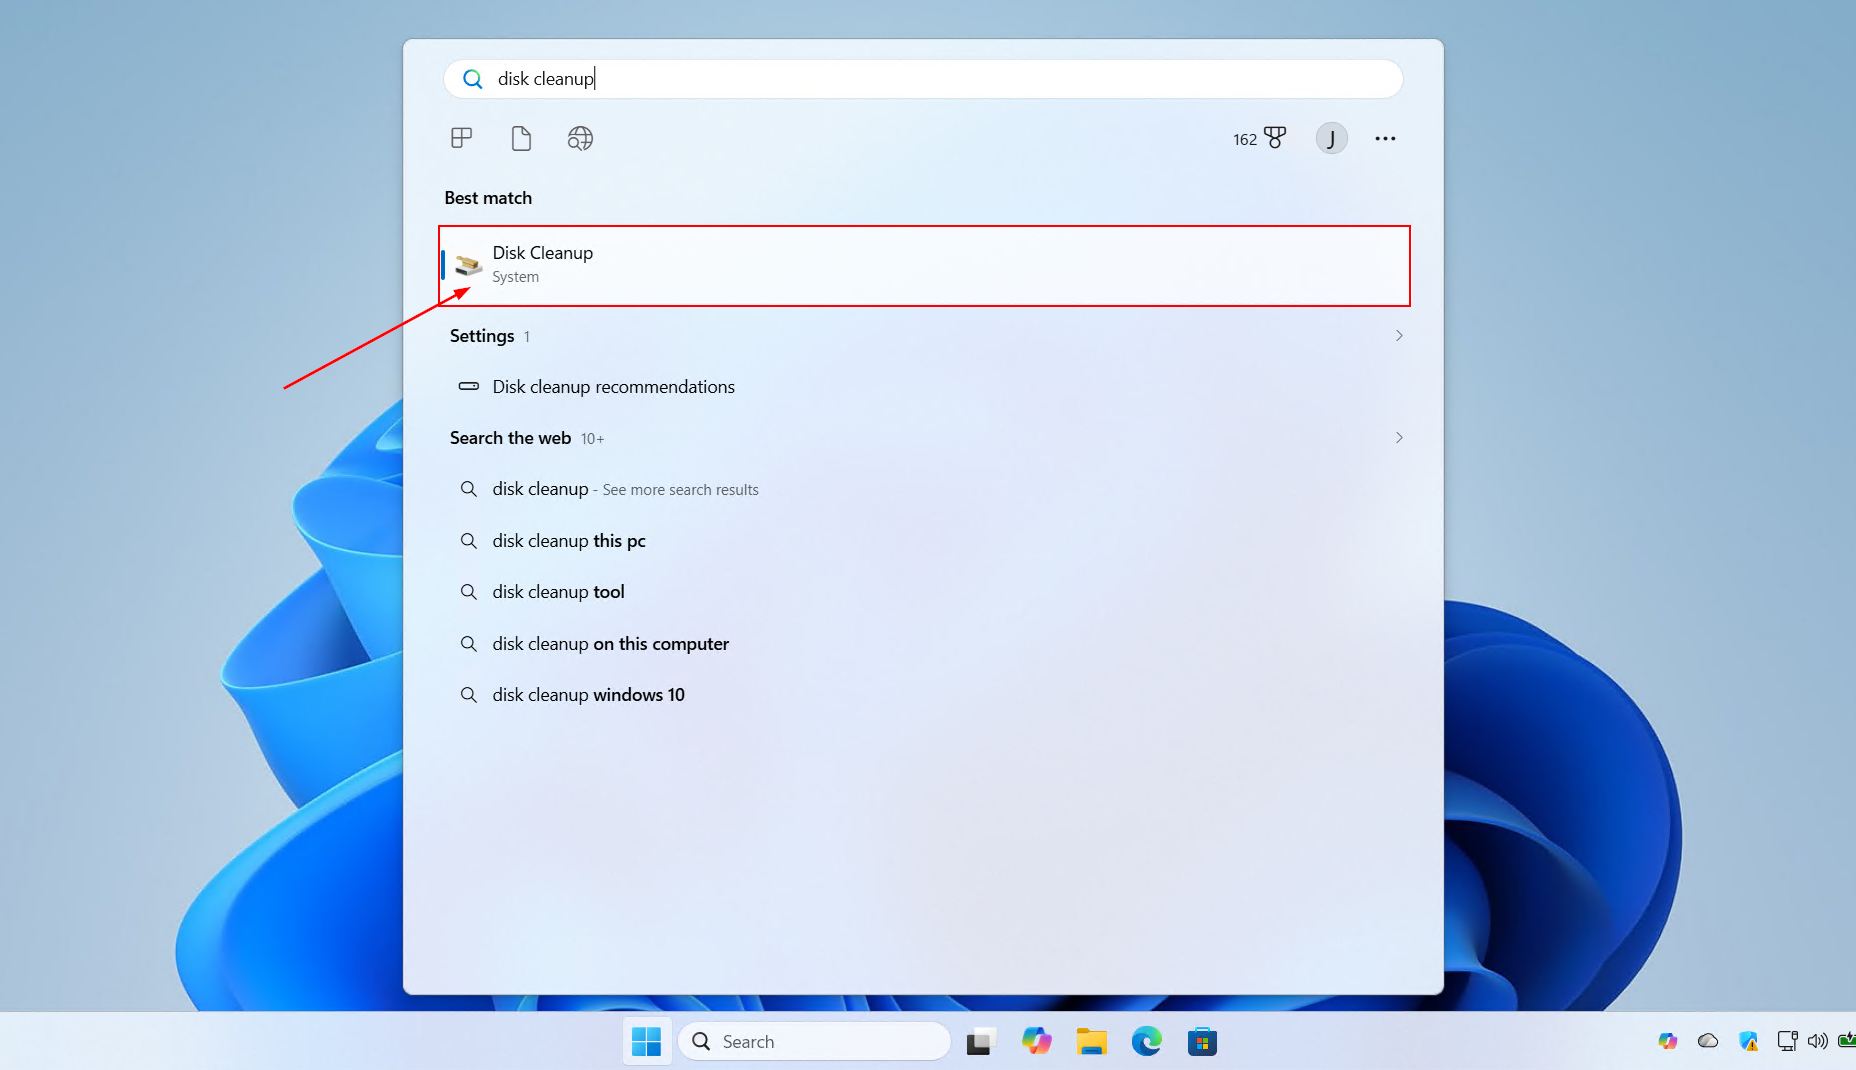
- Press the Windows key and type “Disk Cleanup.” Click the first result to open the application.
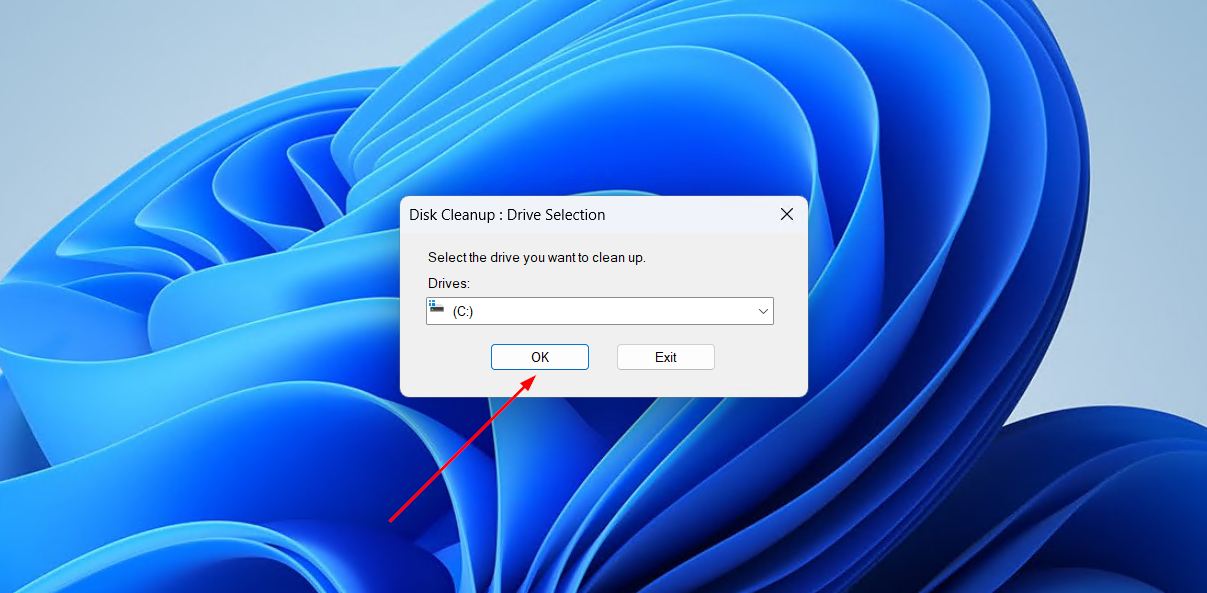
- Select your system drive when prompted. This is typically the C: drive. Click OK and wait while Windows calculates available space.
- Check “Thumbnails” in the list of file types. This targets the disk cleanup thumbnails specifically.
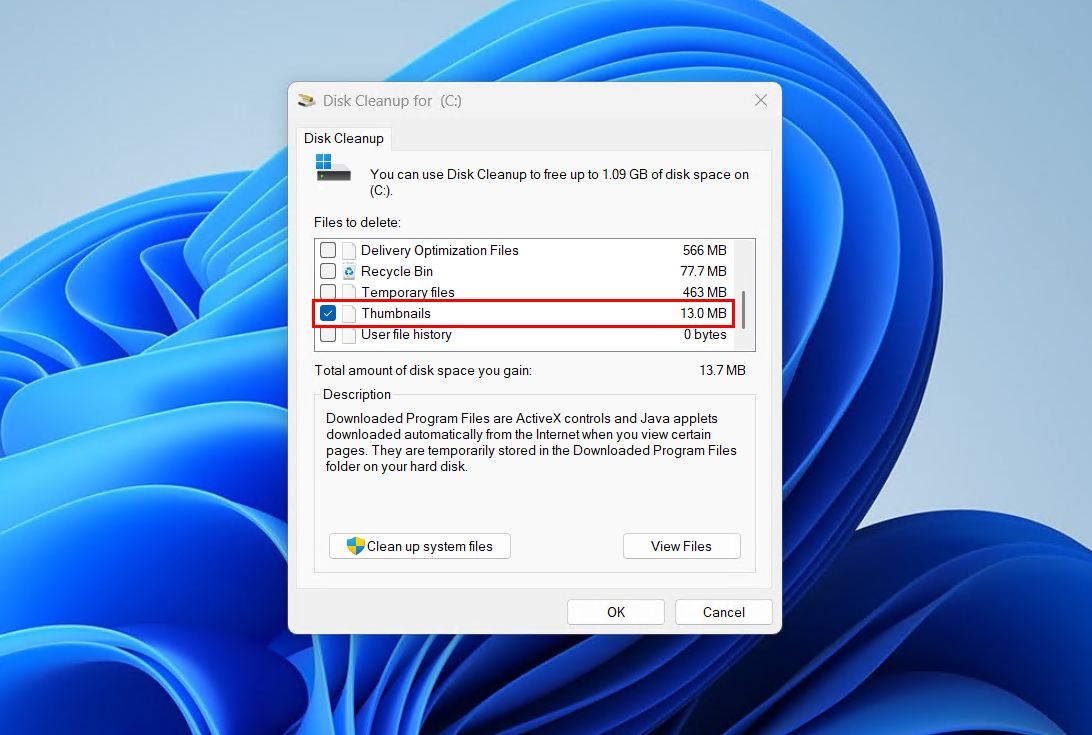
- Uncheck everything else if you only want to clear the cache. If other items remain checked, Disk Cleanup will delete those files as well. Clearing additional categories such as Temporary Internet Files or Recycle Bin contents is generally safe, but unchecking them keeps the operation focused.
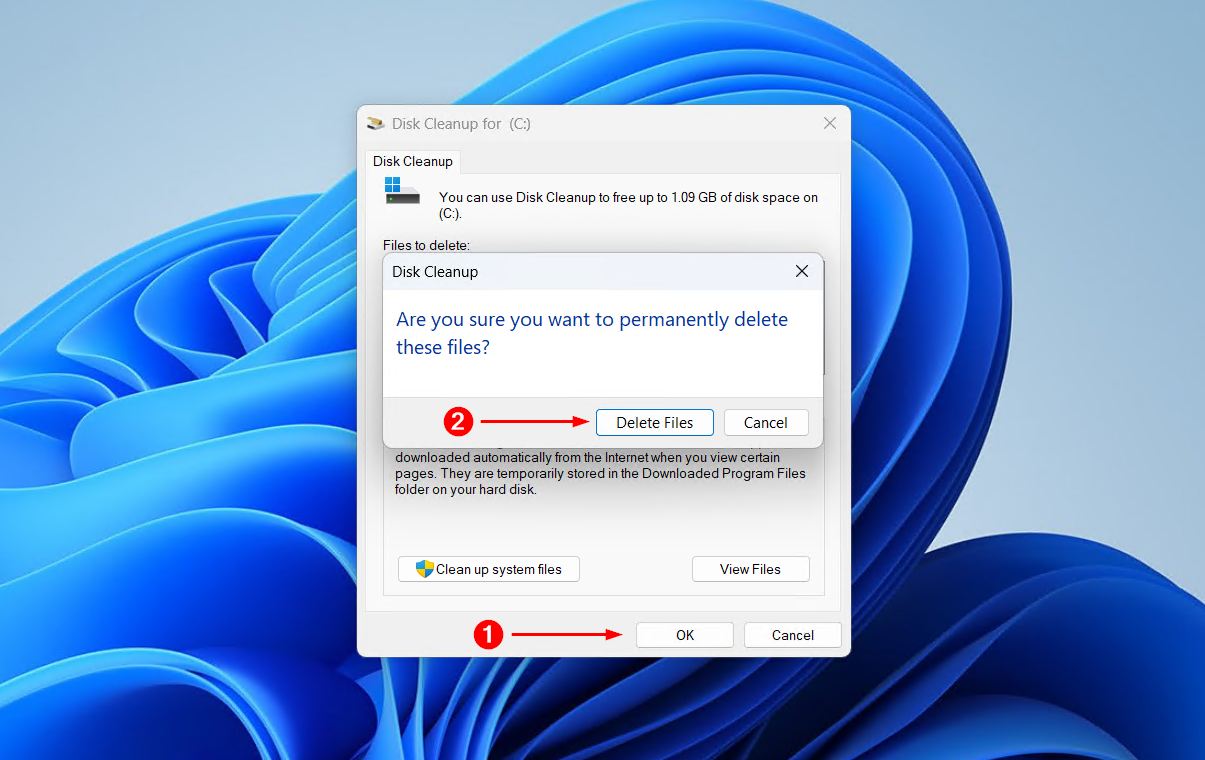
- Click OK, then click “Delete Files” to confirm. Windows will delete the cache and close the tool.
Option 2:
Clear Thumbnail Cache Manually via File Explorer
This method lets you navigate directly to the cache folder and delete the files yourself. No third-party tools are needed, making it a reliable way to clear thumbnail cache without software.
The windows thumbnail cache location is:
C:\Users\<YourUsername>\AppData\Local\Microsoft\Windows\Explorer
-
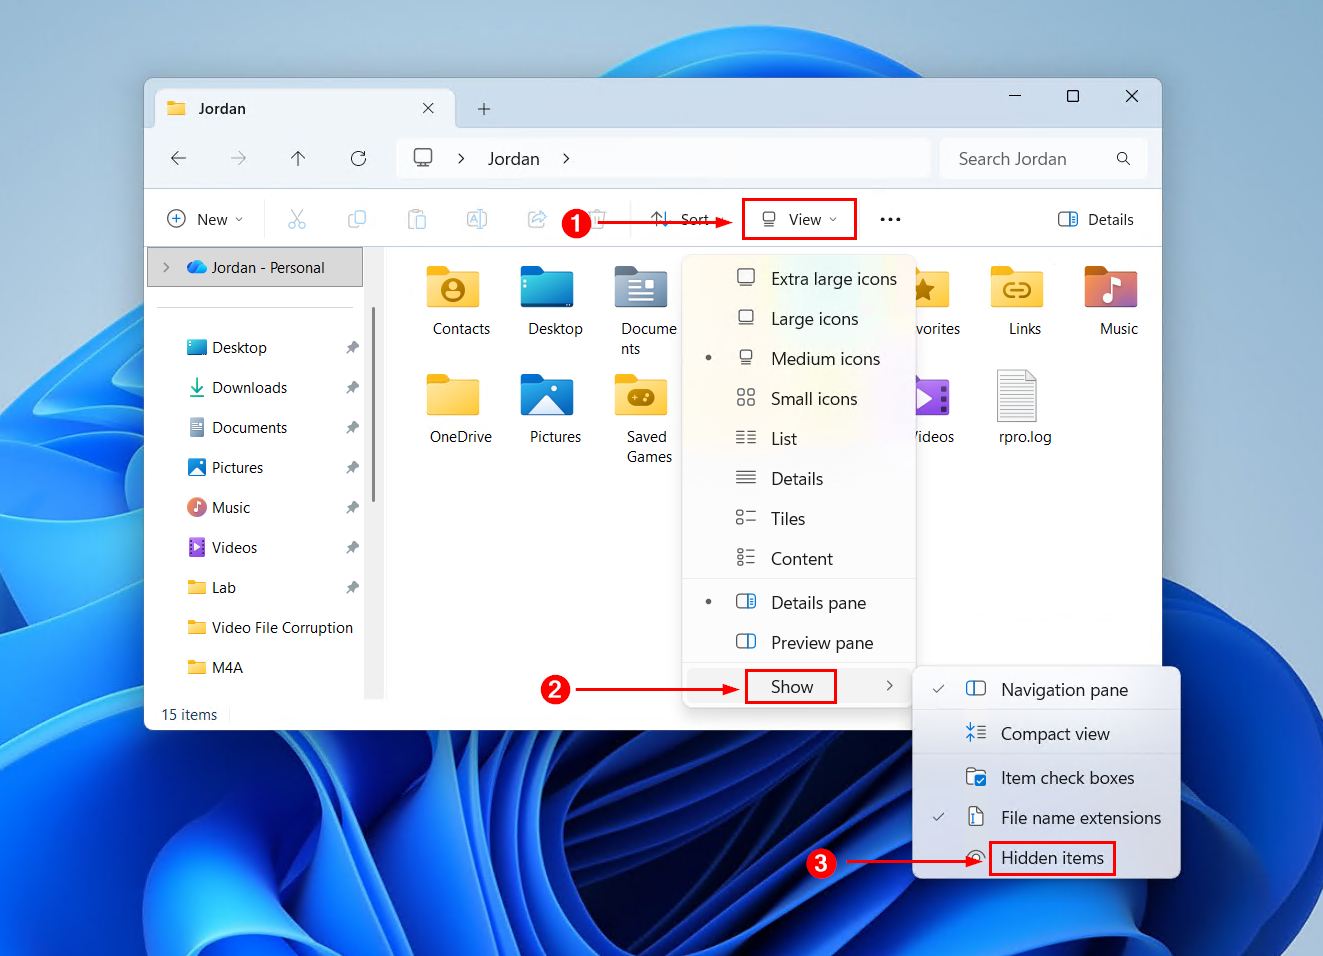
- Open File Explorer and enable hidden files. Click View at the top, hover over Show, and check Hidden items. The AppData folder is hidden by default and will not appear otherwise.
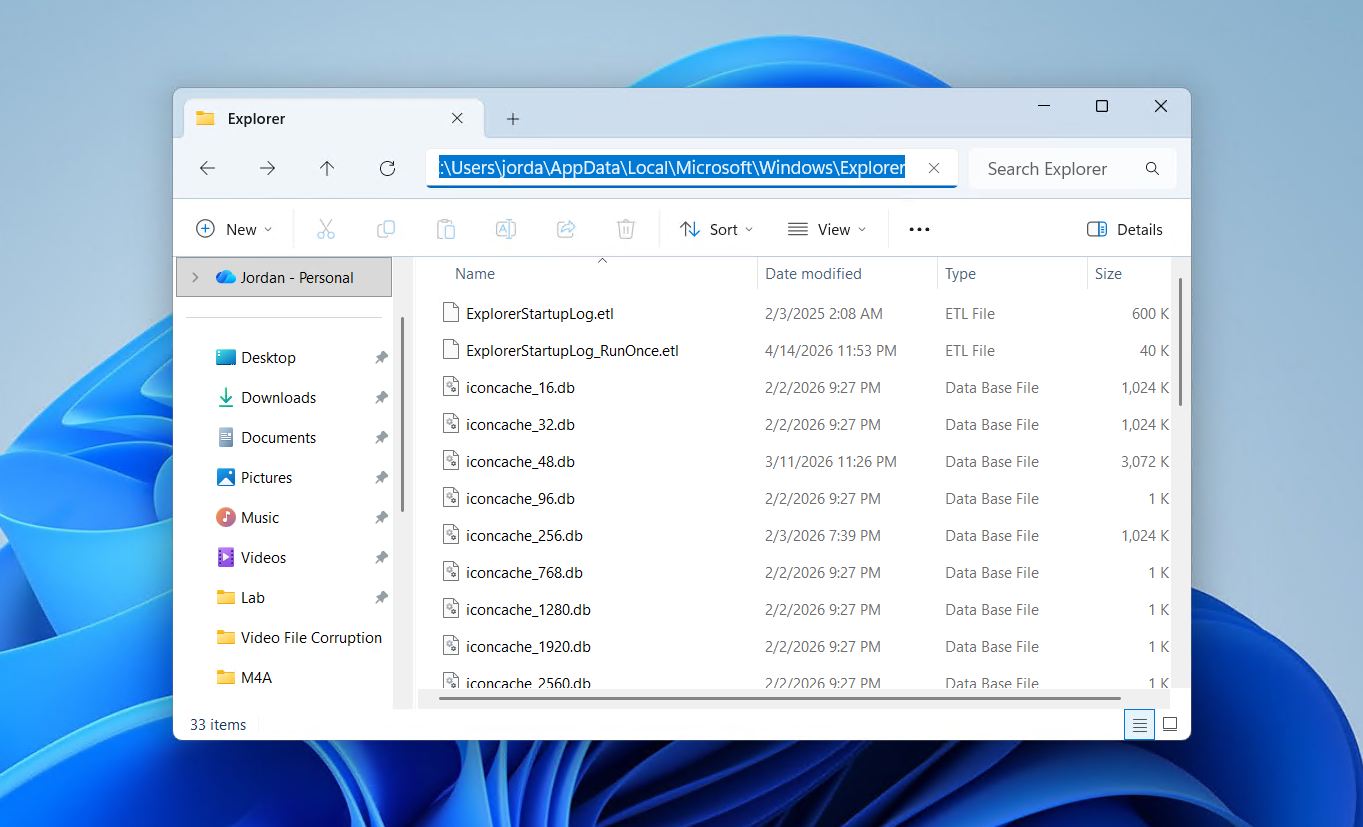
- Navigate to the thumbnail cache folder. Click the address bar, paste the path below, and press Enter. Replace <YourUsername> with your actual Windows account name:
<C:\Users\<YourUsername>\AppData\Local\Microsoft\Windows\Explorer
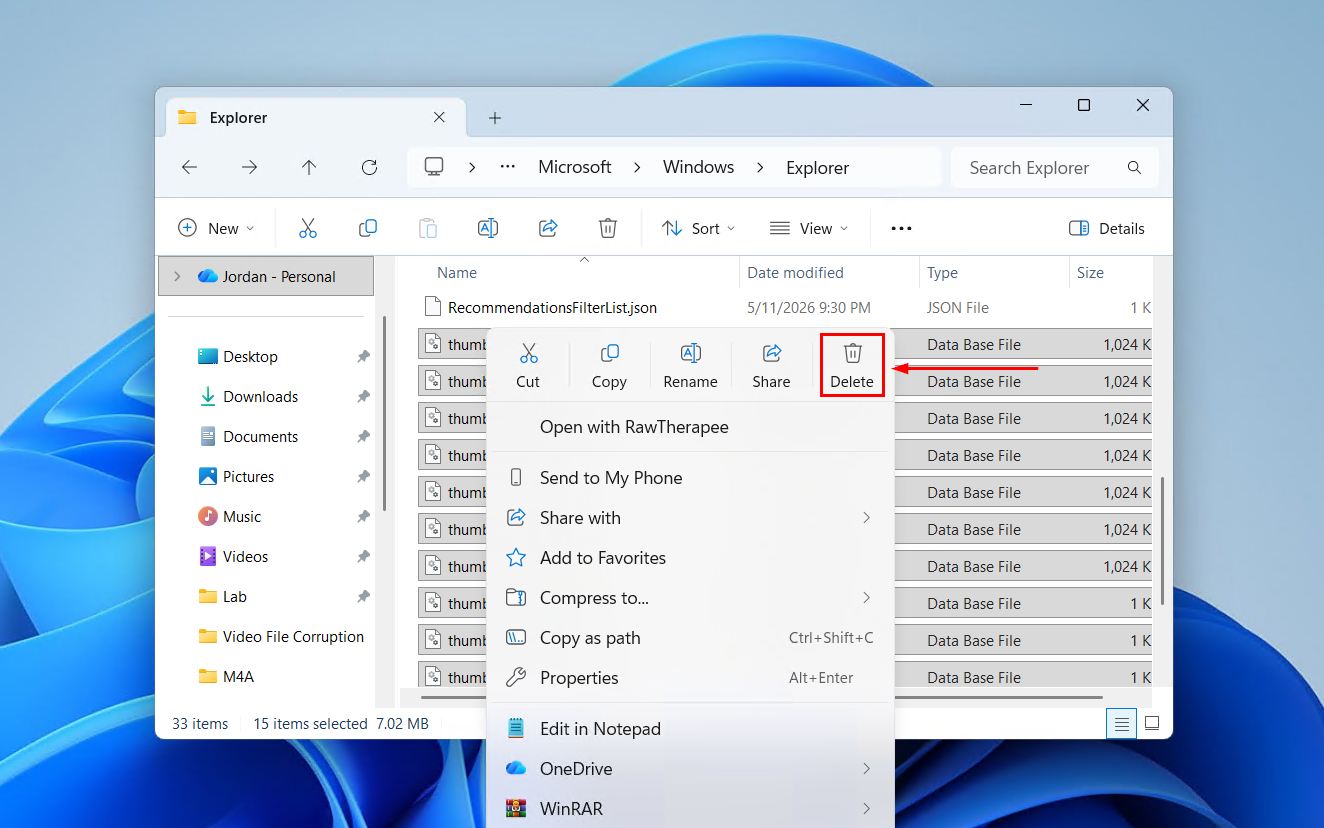
- Select all files beginning with “thumbcache_”. These are the thumbcache database files that store your cached previews. Sorting the folder by name makes them easier to find.
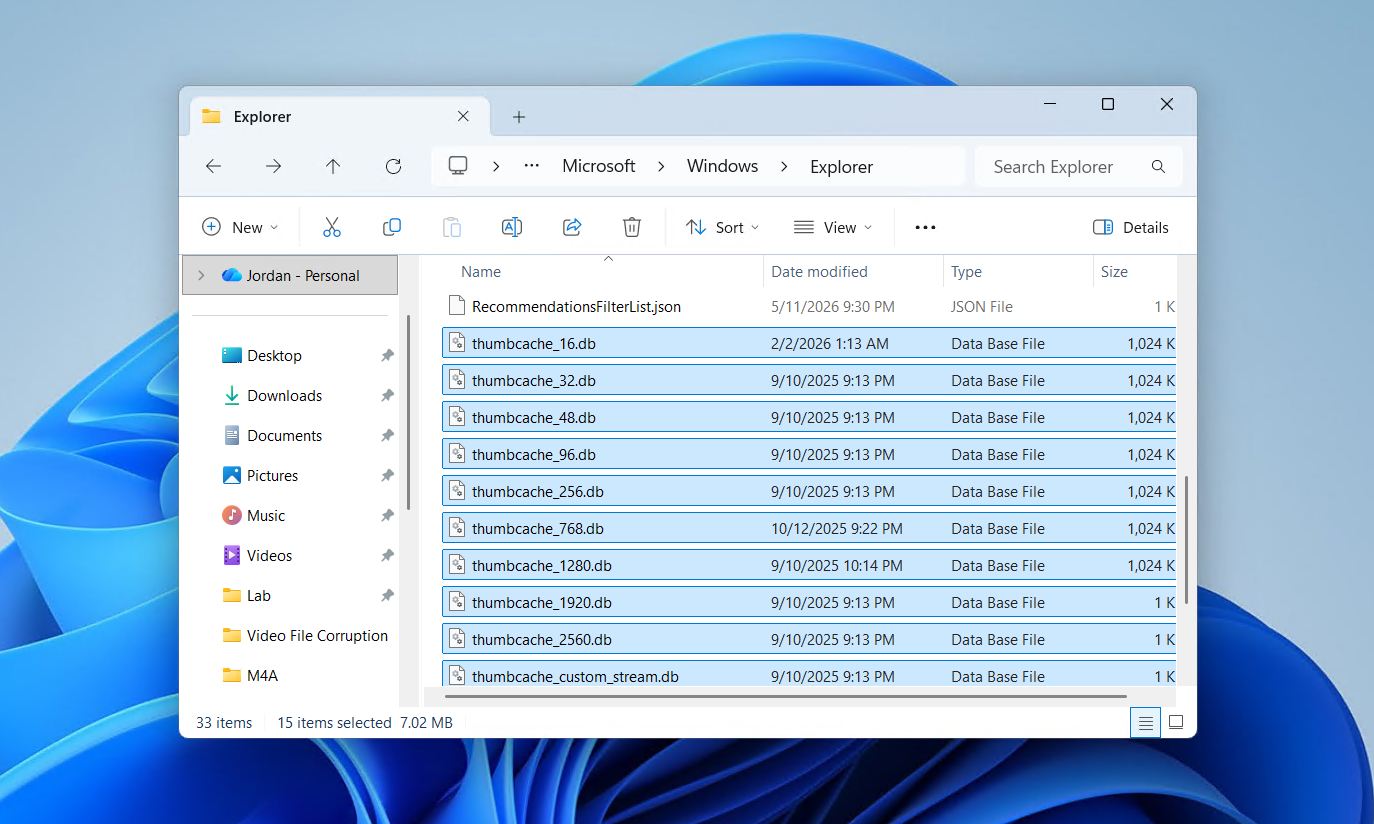
- Delete the selected files. Right-click and choose Delete, or press the Delete key. If Windows reports that the files are in use, complete the next step first and then return to delete them.
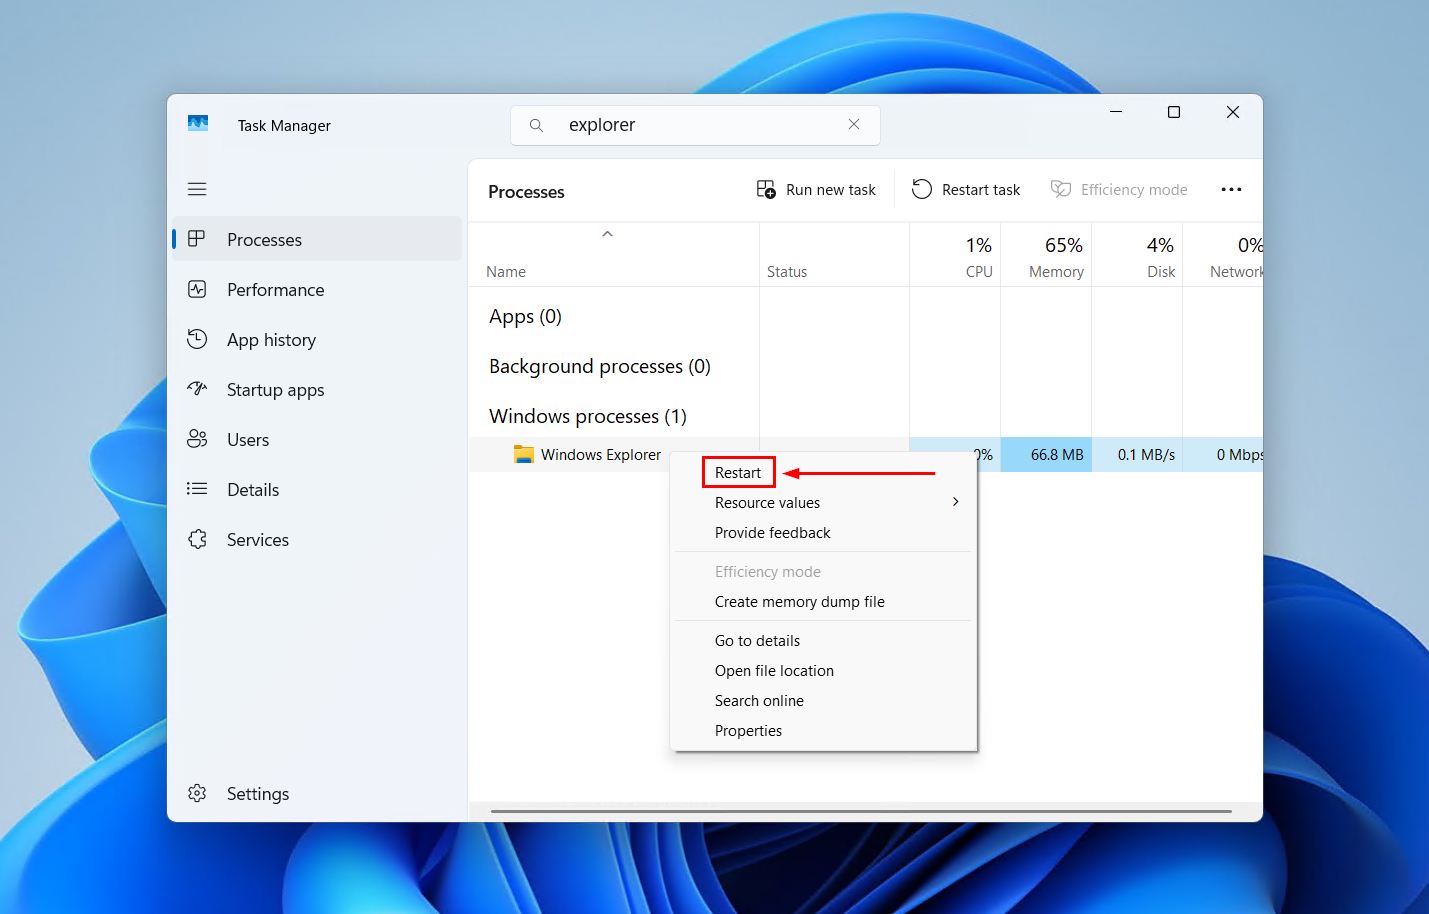
- Restart Windows Explorer to release any file locks. Open Task Manager with Ctrl + Shift + Esc, locate Windows Explorer under the Processes tab, right-click it, and select Restart. Once Explorer has restarted, retry the deletion.
- Open File Explorer and enable hidden files. Click View at the top, hover over Show, and check Hidden items. The AppData folder is hidden by default and will not appear otherwise.
Windows will regenerate the cache automatically the next time you browse folders in File Explorer.
Option 3:
Use Command Prompt, PowerShell, or Terminal to Clear Thumbnail Cache
This is the fastest option for users who are comfortable working in a terminal. One command is enough to delete thumbnails and clear the cache. It also works if you want to rebuild thumbnail cache on Windows 10, as the command is identical across both versions.
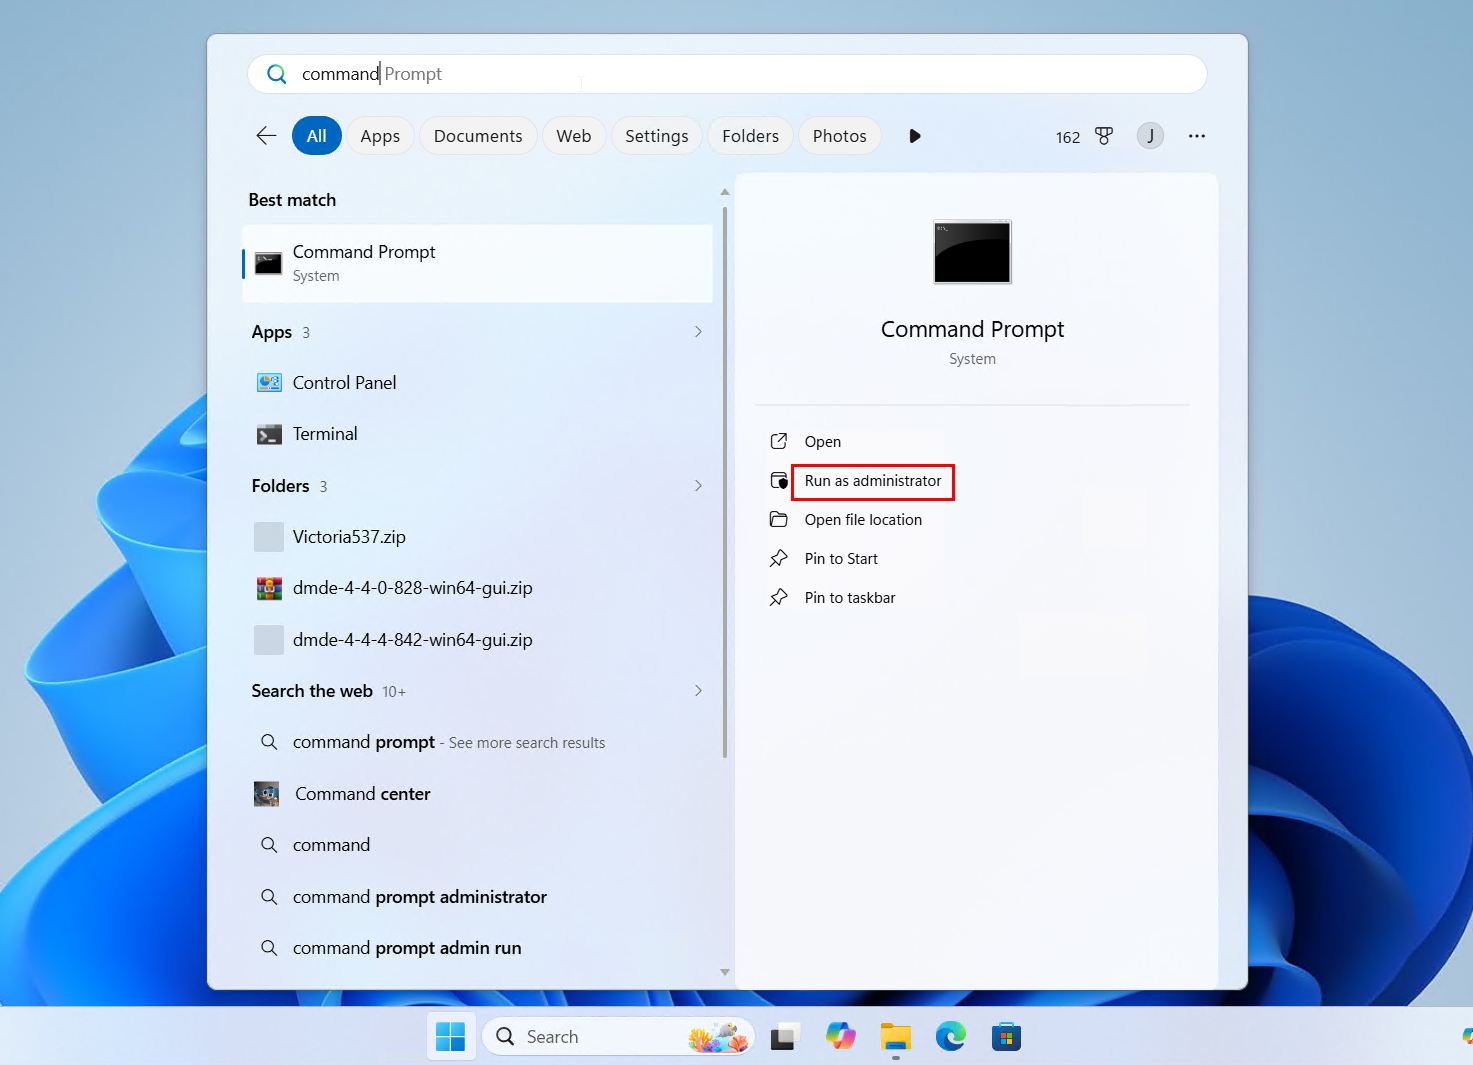
- Open Command Prompt or PowerShell as Administrator. Press the Windows key, type cmd or PowerShell, right-click the result, and select Run as administrator.
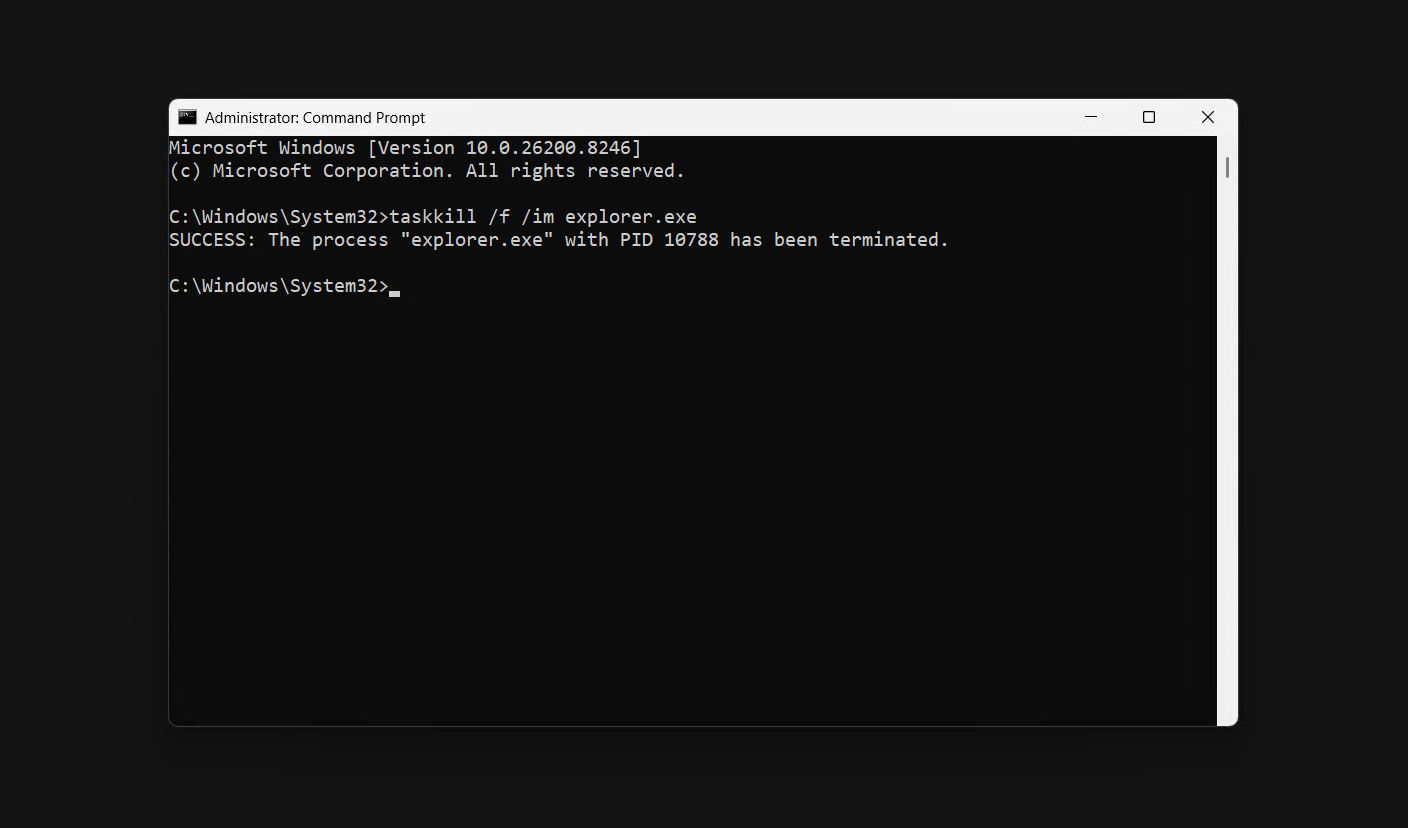
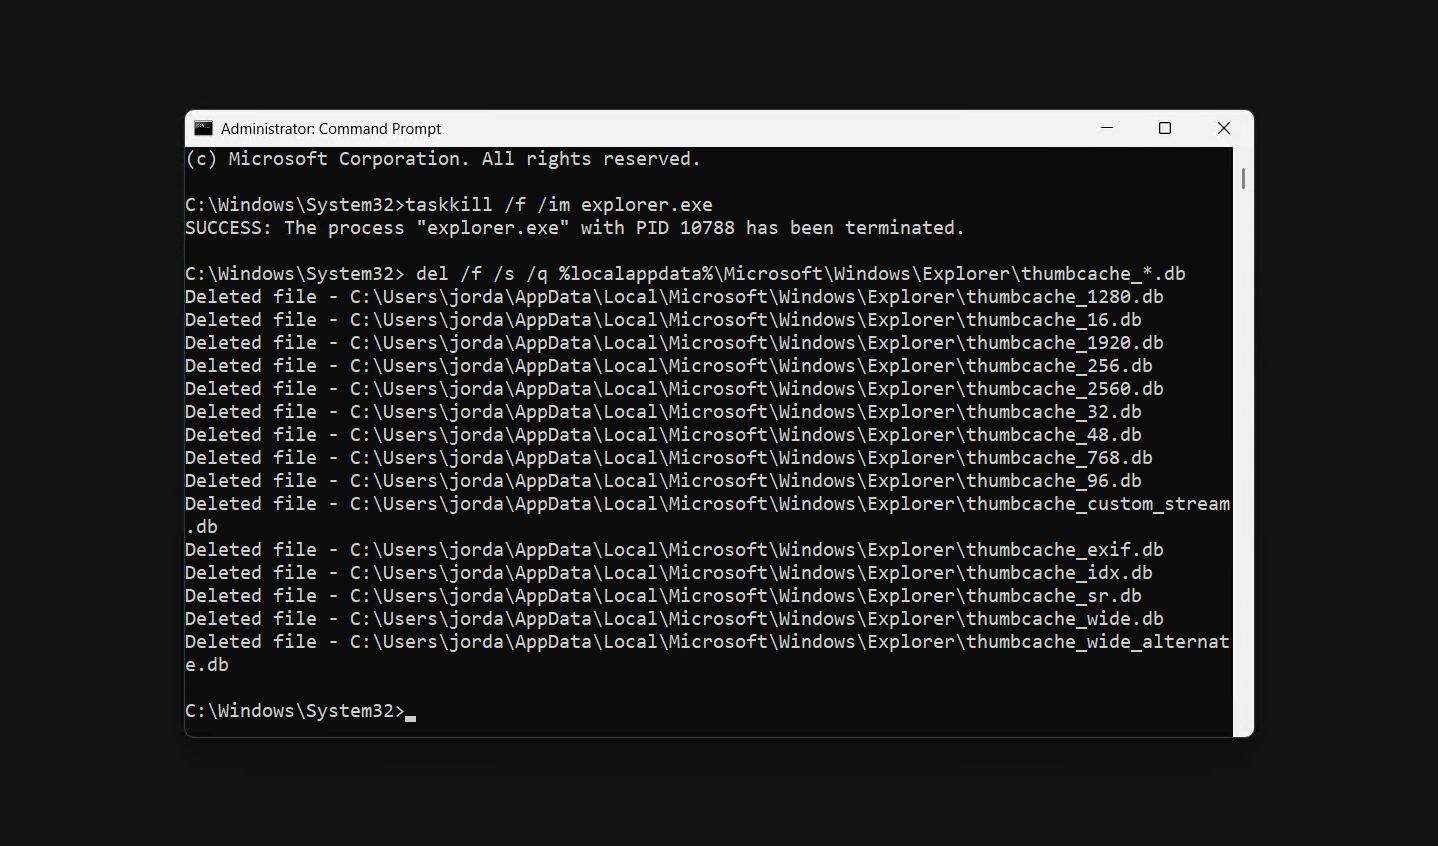
- Stop Windows Explorer to release the cache file locks. Type the following command and press Enter:
taskkill /f /im explorer.exe
- Run the deletion command. Type or paste the following and press Enter:
del /f /s /q %localappdata%\Microsoft\Windows\Explorer\thumbcache_*.db
This removes all thumbcache database files without a confirmation prompt.
- Restart Windows Explorer. Type the following and press Enter:
start explorer.exe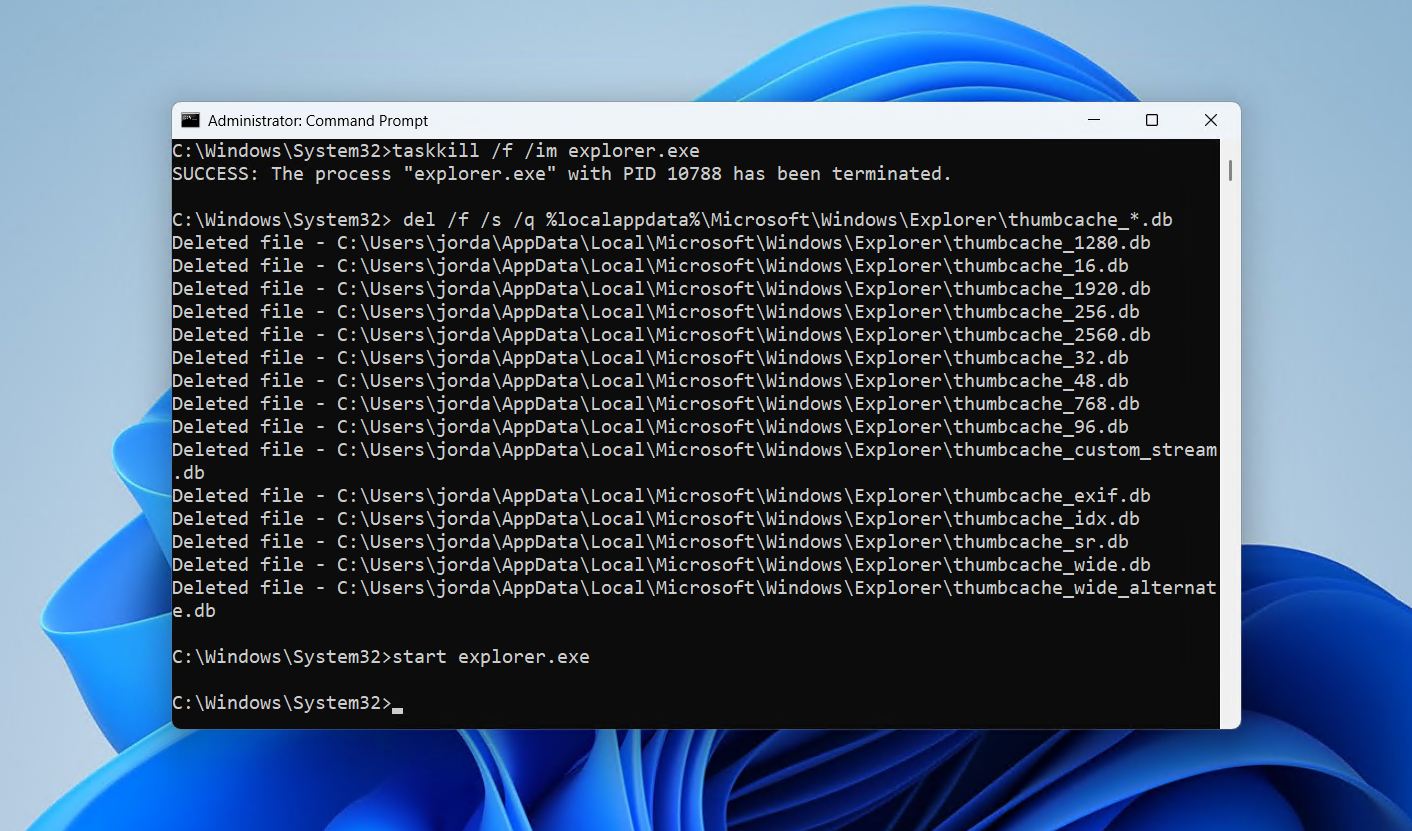
- Your cache thumbnails have been cleared. Windows will rebuild them as you browse.
Option 4:
Use a Batch File to Clear Thumbnail Cache
If you expect to be cleaning thumbnails more than once, a batch file saves time on future runs. Save it to your Desktop and run it whenever needed. The script below asks for confirmation before proceeding, lists each file it deletes, and restarts Explorer automatically when finished.
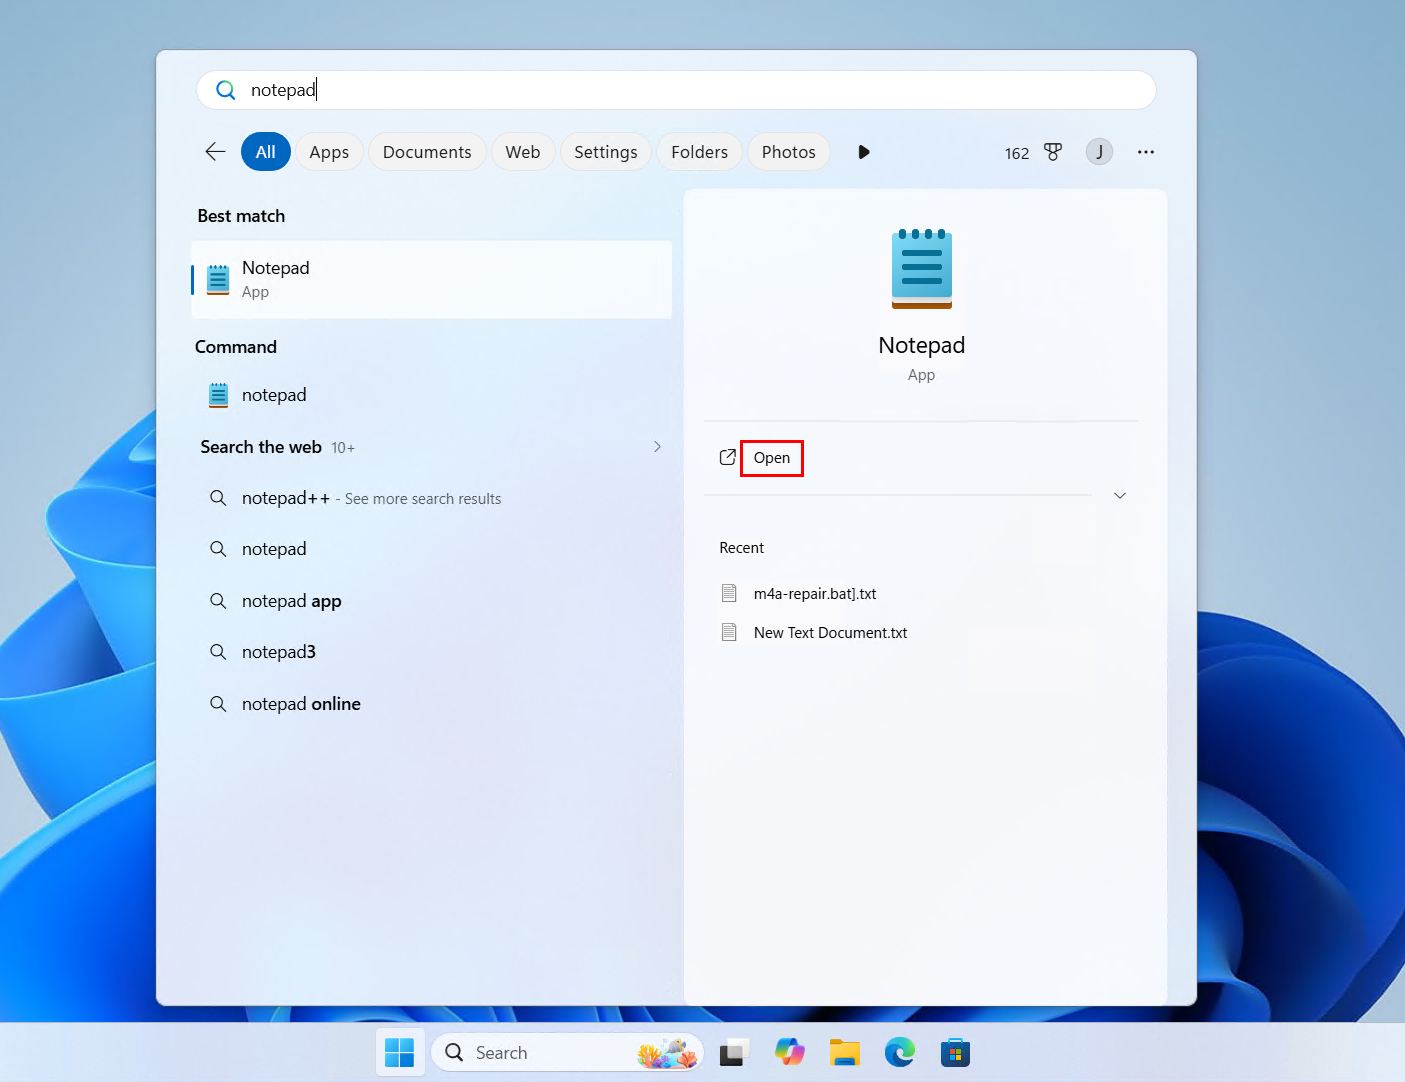
- Open Notepad. Press the Windows key, type Notepad, and click to open it.
- Paste the following script into Notepad:
Batch Script
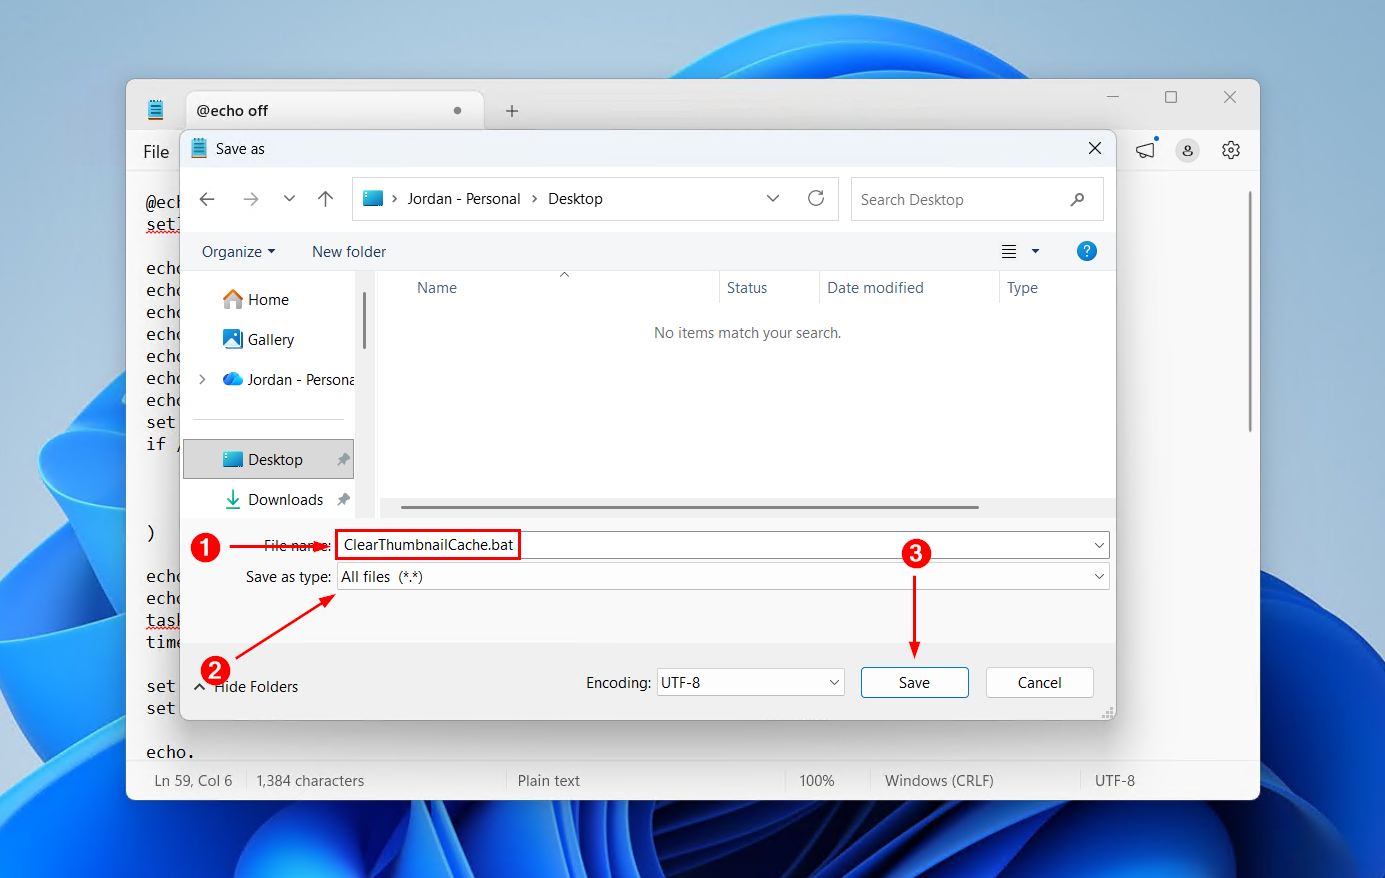
@echo off :: Batch script to delete thumbnail and icon cache files in Windows :: Define thumbnail and icon cache directories set THUMBNAIL_CACHE_DIR=%LOCALAPPDATA%\Microsoft\Windows\Explorer set ICONCACHE_DIR=%LOCALAPPDATA%\Microsoft\Windows\Explorer :: Confirm before proceeding set /p CONFIRM=This will delete your thumbnail and icon cache. Continue? (Y/N): if /i not "%CONFIRM%"=="Y" ( echo Operation cancelled. pause exit /b ) echo. echo Deleting thumbnail and icon cache... echo. :: Delete thumbnail cache files and list each one for %%f in ("%THUMBNAIL_CACHE_DIR%\thumbcache*.db") do ( echo Deleted: %%f del /f /q "%%f" ) :: Delete icon cache files and list each one for %%f in ("%ICONCACHE_DIR%\iconcache*.db") do ( echo Deleted: %%f del /f /q "%%f" ) echo. echo Thumbnail and icon cache deletion complete. echo. pause - Save the file with a .bat extension. Click File > Save As and name the file ClearThumbnailCache.bat. In the Save as type dropdown, select All Files (*.*) to prevent Notepad from adding a .txt extension. Save it somewhere accessible, such as your Desktop.
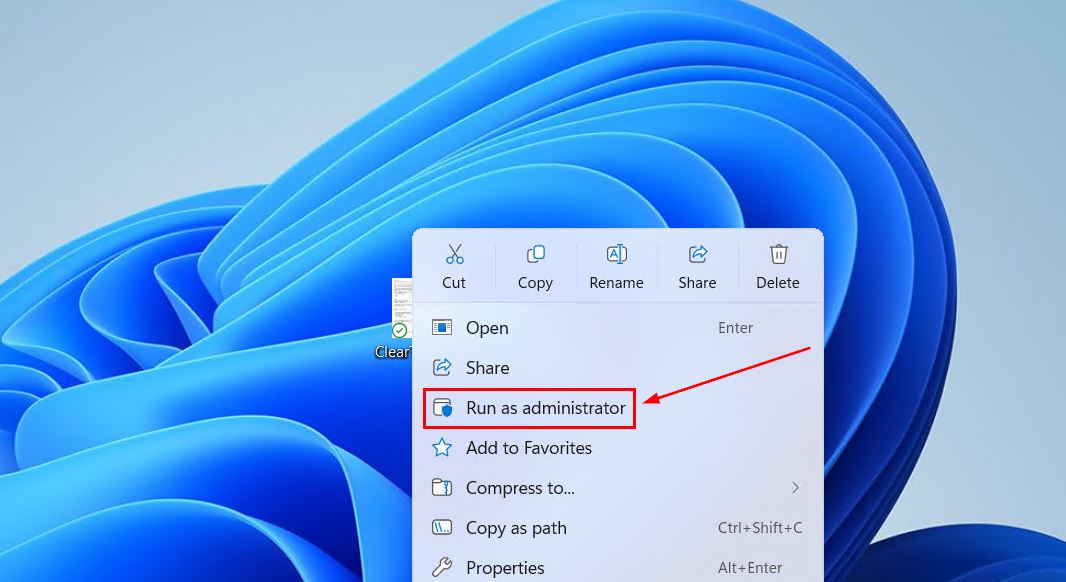
- Run the batch file as Administrator. Right-click the .bat file and choose Run as administrator. The script will ask for confirmation, print the name of each file it deletes, and restart Explorer when it’s done.
How to Rebuild the Thumbnail Cache
After clearing the cache, Windows 11 rebuilds it automatically. No additional steps are required.
To trigger the rebuild right away:
- Clear the thumbnail cache using any of the methods above.
- Open File Explorer. Press Windows + E or click the folder icon in your taskbar.
- Browse folders that contain images or videos. Windows generates fresh thumbnails as you navigate. Folders with a large number of high-resolution files may take a few extra seconds to load on the first visit.
The more folders you open, the more of the cache gets rebuilt. Windows handles the rest in the background.
What is the Thumbnail Cache in Windows 11?
When you open a folder in File Explorer, Windows reads each image or video file and generates a small preview image for the icon. Rendering those previews takes processing time, so Windows stores them in a hidden database on your drive. That database is the thumbnail cache.
The next time you open the same folder, Windows loads the previews from the cache instead of re-reading each file. This makes folder browsing faster.
The cache is stored at the windows thumbnail cache location:
C:\Users\<YourUsername>\AppData\Local\Microsoft\Windows\Explorer
The database files in that folder use the thumbcache prefix and a .db extension.
When the cache causes problems:
- A file is renamed, moved, or edited, but the thumbnail still shows the old version
- The database becomes corrupted after an unexpected shutdown or a software conflict
- Windows displays the wrong preview for a file
In any of these cases, clearing the cache forces Windows to rebuild it from the current state of your files.
Understanding what are thumbnails in disk cleanup follows from the same idea. Disk Cleanup surfaces the same cache database through its interface. Selecting the Thumbnails option removes the stored previews so Windows starts fresh.
Signs You Might Need to Clear Your Thumbnail Cache
The following symptoms typically indicate that the thumbnail cache needs to be cleared.
- Thumbnails not updating after file changes. If you edit an image, rename a video, or overwrite a file and the thumbnail in File Explorer still shows the old version, the cache has not updated to reflect the change.
- Wrong thumbnails appearing on files. File icons may display previews from different files entirely, or video thumbnails may show frames from a different clip. This usually points to a corrupted thumbcache database.
- File Explorer is slow when opening folders. A large or damaged cache can increase load times rather than reduce them. If folders with many images are noticeably slow to open, or if File Explorer stalls when navigating, clearing and rebuilding the cache may help.
If any of these apply, it’s worth taking a few minutes to delete thumbnails and let Windows generate a clean set of previews.
Conclusion
When File Explorer shows incorrect or outdated image previews, clearing the thumbnail cache is usually the fix. Windows rebuilds the cache automatically afterward, so the process is low-risk and takes only a few minutes.
Here’s a quick summary of which method to use:
- Disk Cleanup is the simplest option and requires no technical knowledge
- Manual deletion via File Explorer gives you direct visibility into which files are removed
- Command Prompt or PowerShell is the fastest option for users comfortable with a terminal
- Batch file is the most practical option if you plan to clear the cache more than once
Before any system maintenance, confirm that your important files are backed up. Clearing the thumbnail cache does not affect your personal data, but keeping backups is a good general practice.