Shopify Payments setup and your shipping rates are the two jobs between a finished-looking store and its first real order, and they live on two separate pages: Settings > Payments and Settings > Shipping and delivery. We work through both in the order you click through them: what Shopify asks for, activating Shopify Payments, PayPal, manual methods, shipping zones and rates, local delivery and pickup, packages and labels, then a test order.
What each sale costs is a separate question, and our comparison of Shopify, WooCommerce and Squarespace answers it by setting card processing rates and platform cuts side by side.
What Shopify Payments Setup Asks For
Shopify Payments only works for stores based in one of about 40 supported countries, including the United States, Canada, the UK, Australia, New Zealand and most of the EU. If yours isn’t one of them, you can still take cards through a third-party provider, added with Choose a provider in the Payment providers section of Settings > Payments.
If your country is on the list, gather these before you start the form:
- Two-step authentication turned on for your Shopify account, which Shopify requires for Shopify Payments. Payouts can be held until it is on.
- Personal details: your full legal name as it appears on your ID, your date of birth, a street address that is not a PO box, a phone number and, in the US, your SSN or ITIN.
- Business details: the legal registered name, the business type, a registration number where one applies (a registered US business needs its EIN), and the business address.
- One account representative: the owner for a sole proprietorship, or an owner or senior executive for any other business type.
- ID photos, if Shopify asks for them: color photographs of the original document, not scans or copies, with all four borders visible and nothing censored, blurred or cropped. Photo ID must be PNG or JPEG; proof of address and business documents can also be PDF.
Set your currency first: choose your store currency before your first sale. Changing it afterward means contacting Shopify Support.
How to Complete Your Shopify Payments Setup
Everything starts on Settings > Payments in your Shopify admin.
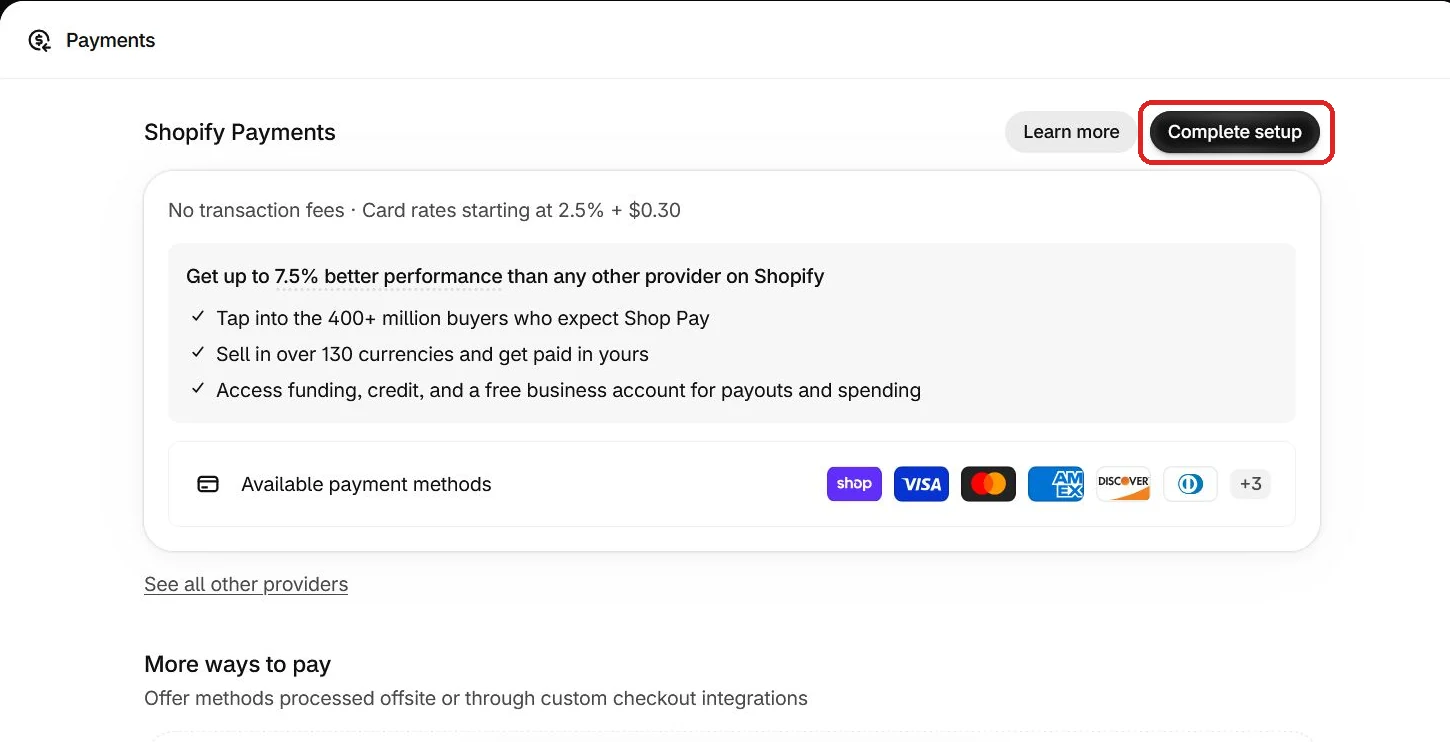
- Open Settings > Payments.
- Click Activate Shopify Payments to open the account form. On some stores the button reads Complete setup.
- Choose how you run your store: An individual, A registered business or A non-profit, then click Next. Businesses and non-profits also select a Business type. The form has four steps for an individual and five for the other two.
- As an individual in the Shopify Payments setup form, enter your name, date of birth, email, phone and address, then your SSN or ITIN, and click Next. Use your legal name exactly as it appears on your ID.
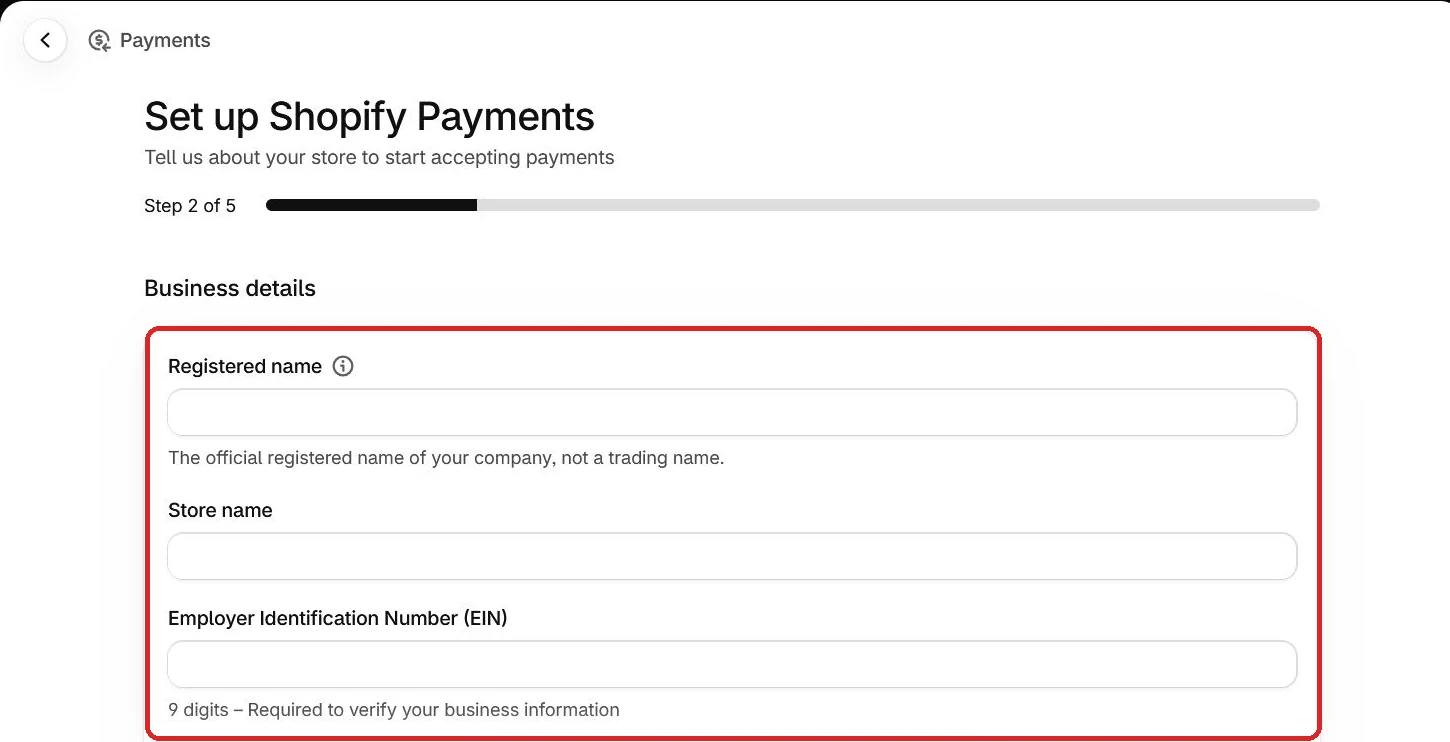
- As a registered business or non-profit, fill in Business details first (Registered name, Store name and the nine-digit EIN), then the account representative’s personal details.
- Enter the phone number to show on your customers’ bank statements, then click Next.
- Review your Business type and Store details, then click Confirm.
- Click Submit for verification.
Any documents you upload can take up to 24 hours to be reviewed, against the photo and document rules on Shopify’s account setup page. Once you’re verified, the last piece of your Shopify Payments setup is the payout bank account: click Add bank account in the Shopify Payments section to connect it.
If your first sale comes through Shop Pay before your payout details are complete, you have 21 days to finish them. After that, Shopify refunds the payment to the customer automatically.
Where PayPal and Manual Payments Fit Into Your Shopify Setup
PayPal and manual methods are two more Shopify payment methods, and both are added from the same Settings > Payments page. You can offer them alongside card payments or instead of them.
PayPal. PayPal Express Checkout isn’t available to merchants in the United States or France, so stores in both countries offer PayPal through PayPal Wallet in Shopify Payments instead. Stores in other countries add PayPal from the same Payments screen.
Manual payment methods. These are payments you collect outside the card checkout and then confirm yourself. Shopify suggests several types, and you can add your own:
- Cash on delivery
- Bank transfer or deposit
- Money order
- A custom method with a name you choose
Adding any of them follows the same four steps:
- Return to Settings > Payments.
- Click Method in the Manual payment methods section, then pick one of the suggested manual methods or create a custom one.
- Fill in Additional details, which show next to the method at checkout, and Payment instructions, which show on the order confirmation page. Say exactly how and where to pay.
- Click Activate to add it to your checkout.
US stores: manual methods only work if your US sales tax is set to Self-directed. A store whose US sales tax is managed by Shopify can’t accept them.
Orders paid this way show as unpaid until you mark them paid. You aren’t charged third-party transaction fees on manual payments, and a custom method can’t reuse one of Shopify’s reserved method names, such as “Cash” or “Gift Card”.
How Shipping Is Organized in Shopify
Your Shopify shipping setup lives on its own page, Settings > Shipping and delivery, and is built from four connected parts:
- Fulfillment locations: where orders ship from.
- Shipping zones: groups of destination countries or regions.
- Shipping profiles: rule sets. Every store starts with one General profile, and you can add custom profiles for specific products.
- Shipping rates: what you charge inside each zone.
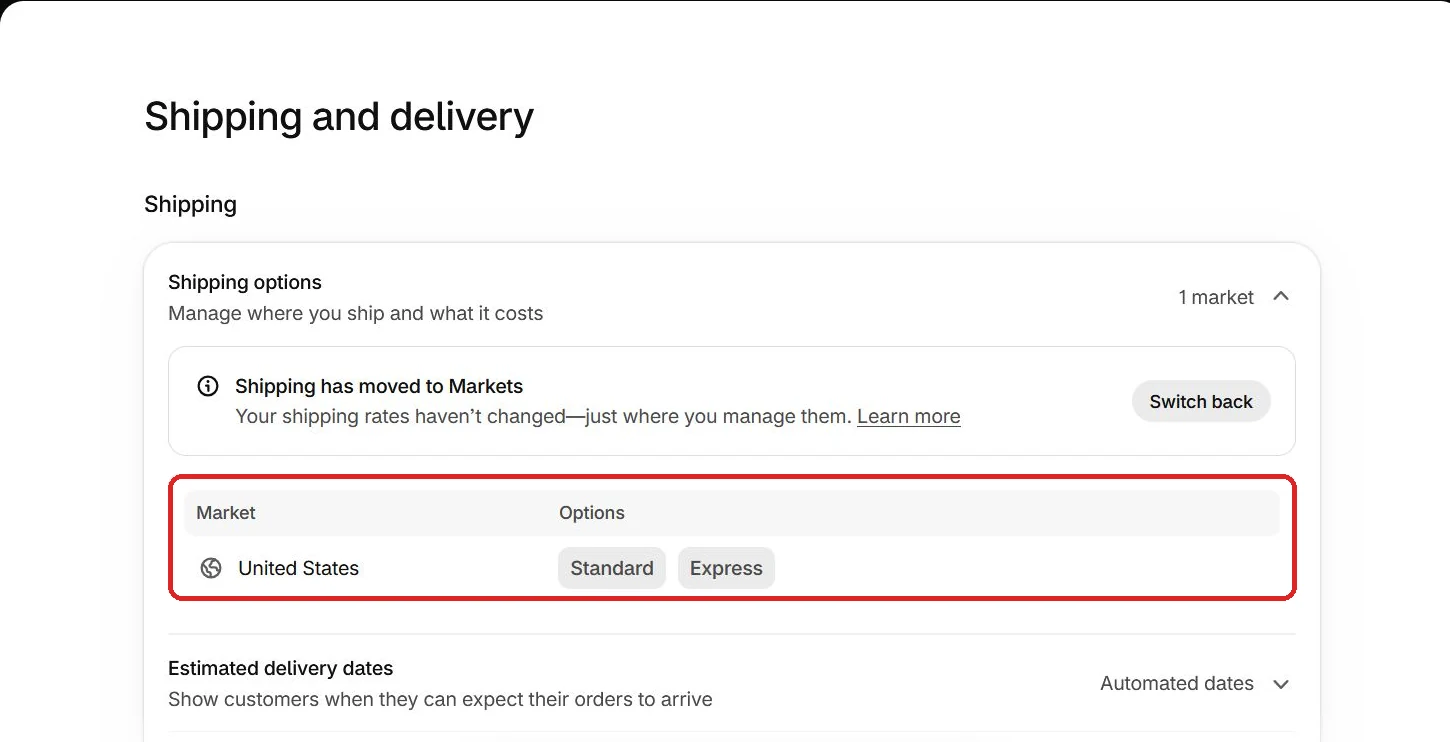
Shopify is moving shipping to Markets gradually, so some stores now show this page organized by market. A notice reads Shipping has moved to Markets, and each market, such as United States, lists its own shipping options, here Standard and Express. In that layout a market does the job of a shipping zone, and the Switch back button returns to the profile layout while that option is offered.
Set Up Shipping Zones and Rates
Zones and rates are built inside a shipping profile. Unless some of your products ship under different rules, the General profile is the one to work in.
- Open the General profile on the Shipping and delivery page.
- Click Add zone, name it, select its countries or regions, then click Done. A country only gets orders if it is also in an active market under Settings > Markets.
- Click Add shipping option in that zone to set its rate.
- Choose a rate type from the Rate type menu: Flat, Order amount or Weight, which you price yourself, or Carrier or app calculated.
If your store shows shipping under Markets, set a rate this way instead:
- On Shipping and delivery, open your market under Shipping options.
- In the Shipping card, open the list of current options and click Add shipping option.
- Enter an Option name and set Type to Flat.
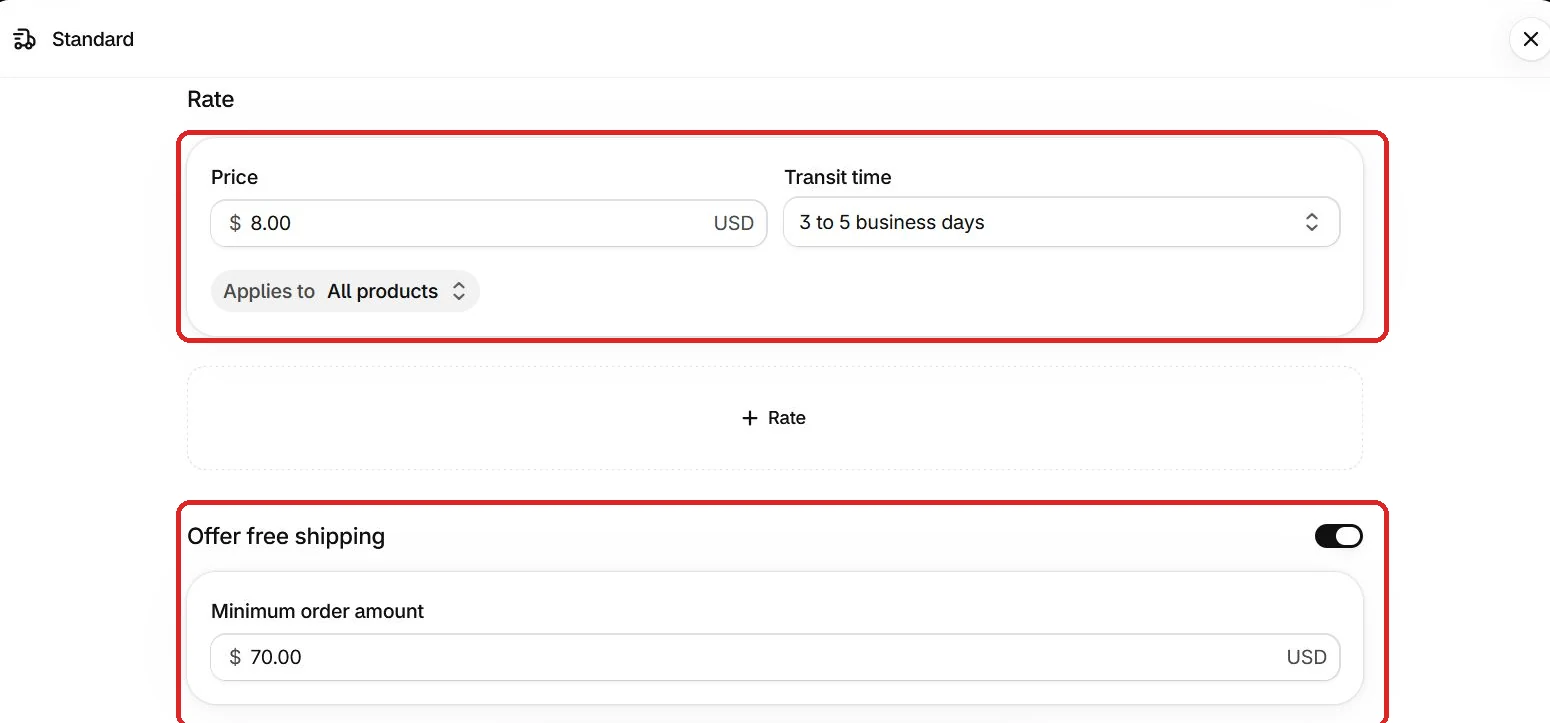
- Enter the Price and Transit time, and choose what the option Applies to. The default is All products.
- To offer free shipping, turn on Offer free shipping and enter a Minimum order amount.
Order amount and Weight rates set their prices in ranges of order value or weight. Flat and carrier-calculated rates ask for different settings:
| Flat | Carrier or app calculated | |
|---|---|---|
| What you set | A Price (blank or 0 means free) | Choose carrier and apps, then the carrier and which of its services to show |
| Optional | A transit-time estimate | Auto-include new services; a handling fee, flat or a percentage |
| Free shipping | Offer free shipping with a minimum order amount | Same setting, same field |
| Finish with | Done, then Save | Done twice, then Save |
A Shopify free shipping threshold works under any of the four rate types, so you don’t need a separate rate for it.
Offer Local Delivery and Pickup in Store
Both sit under Additional delivery methods on the Shipping and delivery page, and you set them per fulfillment location.
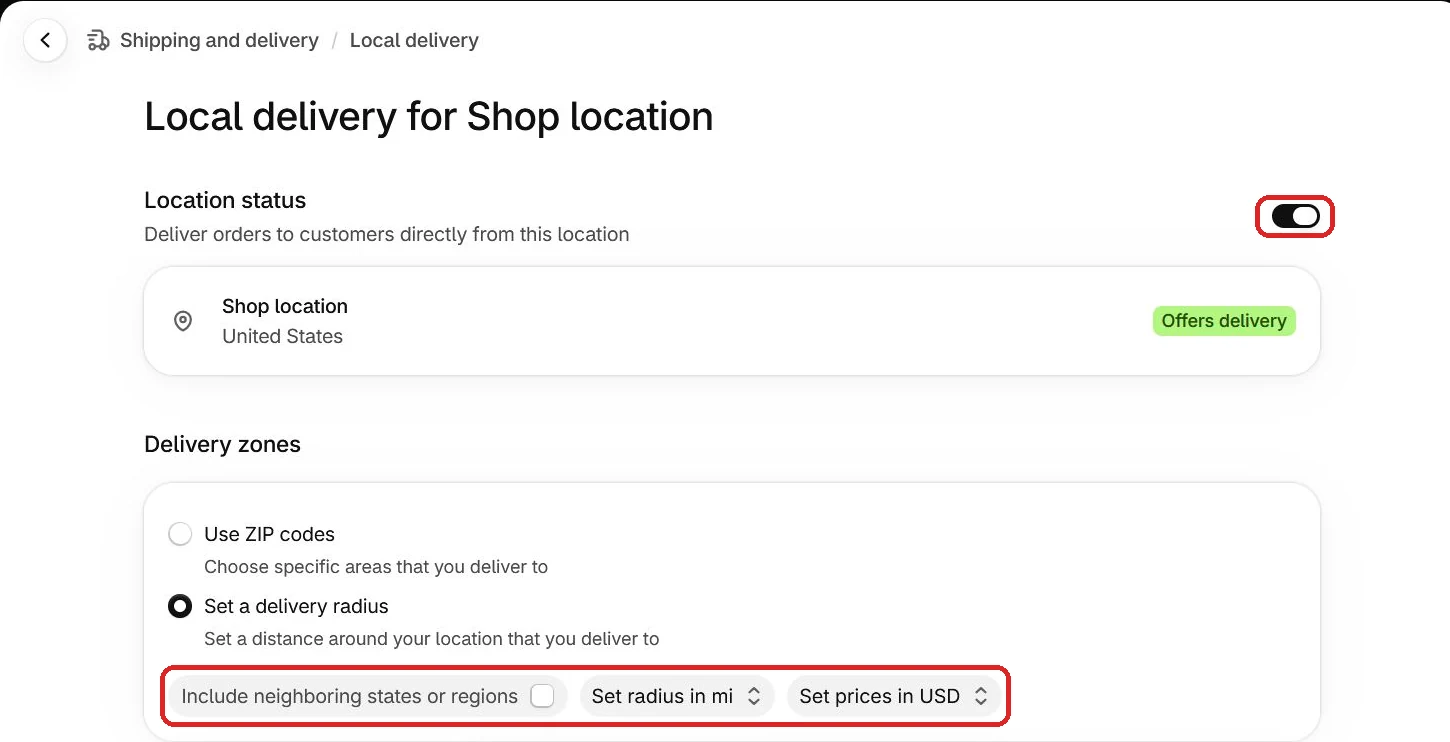
Local delivery. You choose the delivery zone by postal codes (ZIP codes in the US), entered as a comma-separated list up to 3,000 characters, or by radius, up to 100 miles (160 km). Each zone gets a delivery price (0 for free), an optional minimum order price and up to 3 conditional price rules, and each location can have up to 10 delivery zones.
- Click Local delivery, then click your location. Its page is titled Local delivery for followed by the location name.
- Turn on Deliver orders to customers directly from this location under Location status.
- Under Delivery zones, choose Use ZIP codes or Set a delivery radius, then set the zone and its delivery price. Each zone appears as a card, and Zone adds another.
- Click Save.
Pickup in store. To let customers collect orders themselves, set up Shopify’s local pickup option:
- Click Pickup in store on the same page, then click your location.
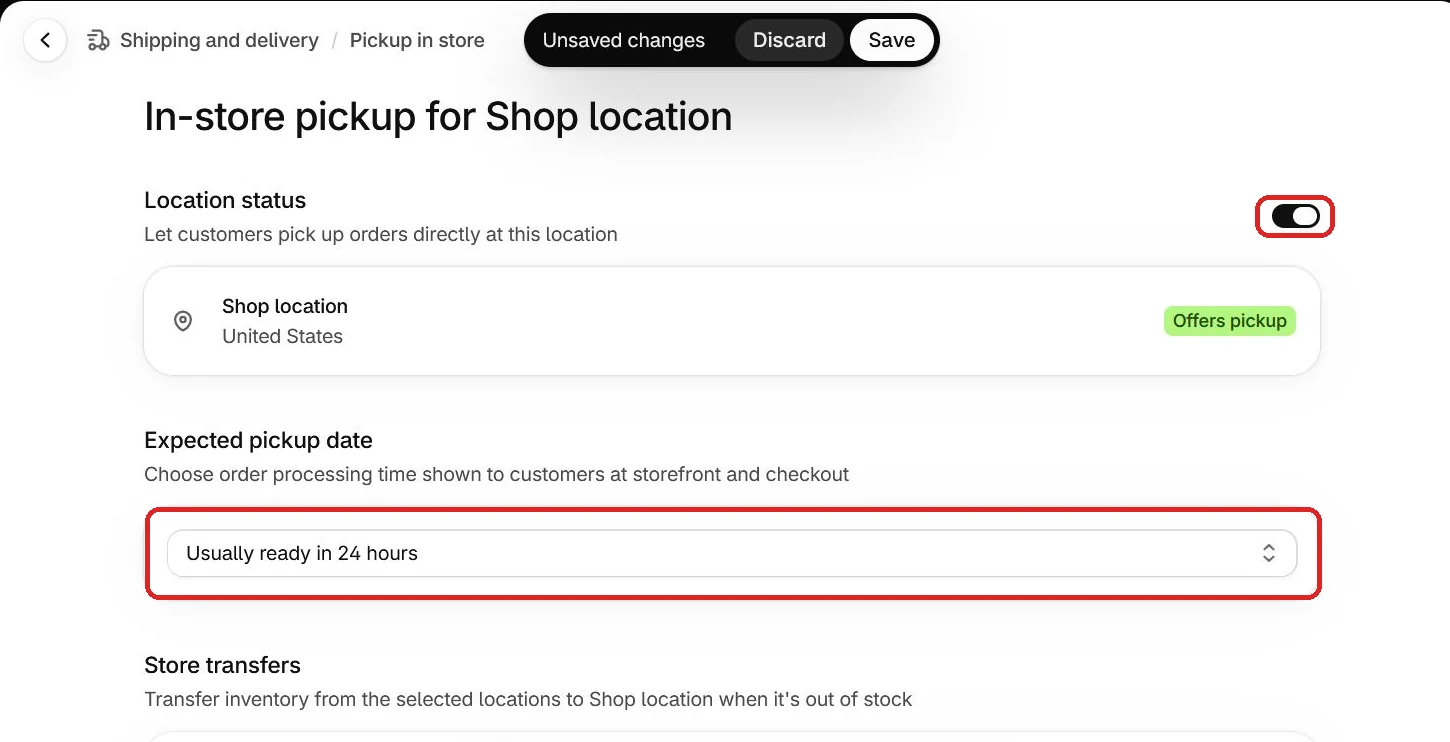
- Turn on Let customers pick up orders directly at this location under Location status.
- Choose the processing time under Expected pickup date.
- Add pickup instructions under Ready for pickup notification.
- Click Save.
A fourth delivery method, pickup points (parcel lockers and post offices), is limited to France, Germany, Italy, Spain and the UK.
Packages and Label Eligibility
Carrier-calculated rates need accurate product weights and box sizes, because carriers price on a package’s weight and outside dimensions. Whether you get them at all depends on your plan, which our plan-by-plan comparison sets out. Shopify adds your default package’s weight to each product’s weight automatically, so the package entry only needs the empty box.
- Head back to Shipping and delivery in your settings.
- Click Add package in the Packages section.
- Enter the package name, package type, dimensions and weight.
- Optionally, tick Use as default package.
- Click Add package to save it.
Shipping labels, which you buy and print from your admin, depend on where your fulfillment location is. The United States, Canada, Australia, the UK, France, Germany, Italy, the Netherlands, Poland and Spain each have supported label carriers, and some carriers also need your store address in the same country.
Test Your Shopify Payments Setup With a Test Order
A Shopify test order runs your checkout with test card details in place of a real payment. Run it last, so one pass checks your Shopify Payments setup and your shipping rates together. Shopify builds in two ways to run it.
The Test payment gateway works with any store on a paid plan and runs the full checkout; many third-party guides still call it the Bogus Gateway. If Shopify Payments is already active, use its own test mode instead.
Method 1: Use the Test Payment Gateway
Activating the gateway means deactivating whichever card provider your store has active.
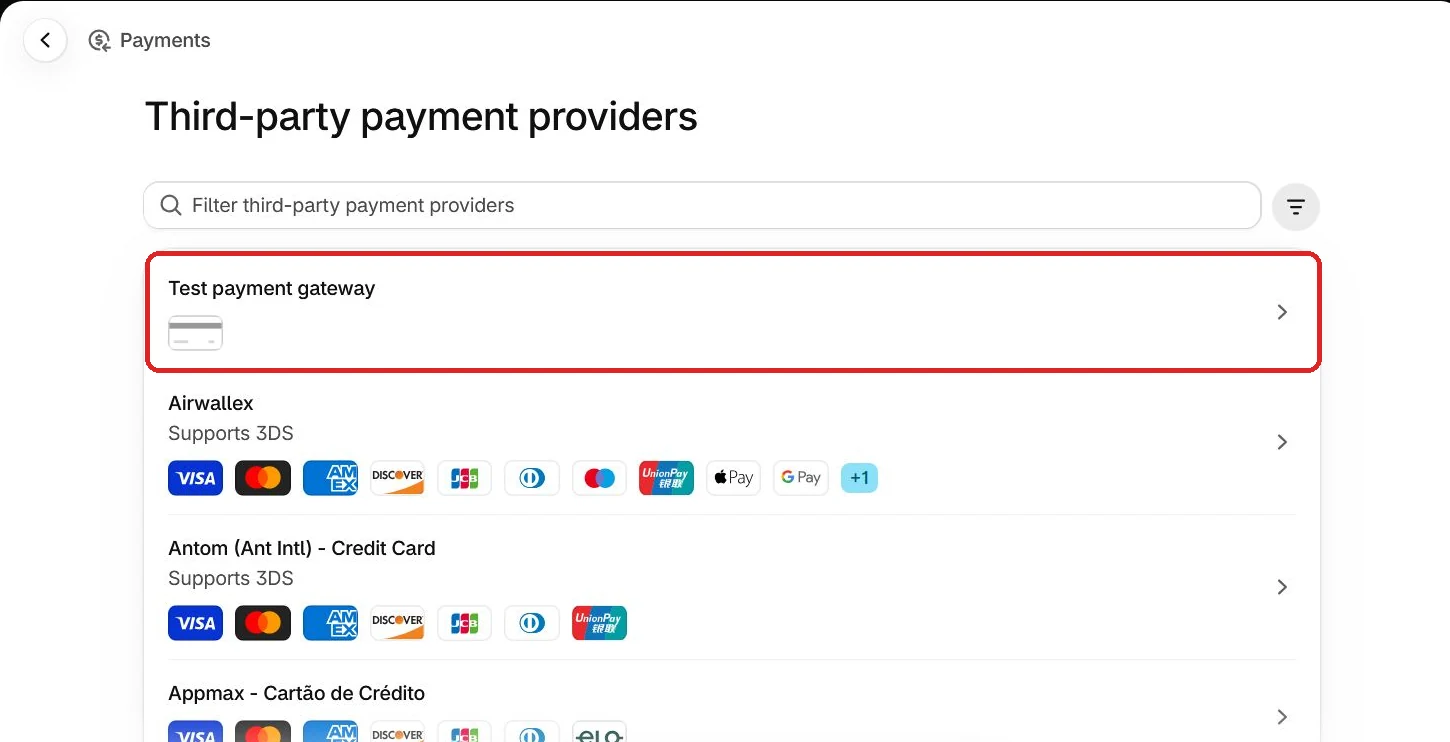
- Open the Payments page under Settings.
- Deactivate your current card provider. For a third-party provider, click Manage > Deactivate, then confirm. For Shopify Payments, click Manage > Manage payment methods, then Switch to a third-party provider at the bottom, and confirm.
- Click See all other providers under Shopify Payments. If Shopify Payments isn’t available in your country, click Choose a provider instead.
- Select Test payment gateway from the list.
- Click Activate, then Save.
Place an order on your storefront as a customer would, and enter these details in the card fields at checkout:
| Field | What to enter |
|---|---|
| Name on card | Test payment gateway |
| Card number | 1 for an approved transaction, 2 for a declined one, 3 for a gateway failure |
| Expiry date | Any date in the future |
| Security code | Any 3 digits |
The order total has to be more than the equivalent of 1 US dollar, and the gateway doesn’t work with Shopify POS or subscription products.
Method 2: Turn On Shopify Payments Test Mode
Test mode is only available once your Shopify Payments setup is complete, as a setting inside Shopify Payments itself:
- Go to Settings > Payments.
- Click Manage beside Shopify Payments to open its settings.
- Choose Enable test mode in the Test mode section.
- Click Save. Your checkout now takes test cards in place of real ones.
At checkout, the first three card numbers below give a successful charge, and the last one tests a generic card decline:
- Visa: 4242 4242 4242 4242
- Mastercard: 5555 5555 5555 4444
- American Express: 3782 822463 10005
- Generic card decline: 4000 0000 0000 0002
Use any future expiry date, a name of at least two words, and any 3-digit security code (4 digits for American Express). Other numbers on Shopify’s list of Shopify Payments test cards trigger other success and failure results.
Before launch: customers can’t place live orders while a payment provider is in test mode. Turn test mode off, or deactivate the Test payment gateway and activate your real card provider again, before you open the store. Test orders never appear in your payouts or reports. Don’t fulfill them, because shipping labels bought on a test order are charged.
Conclusion
Shopify Payments setup starts in Settings > Payments: turn on two-step authentication, enter your personal and business details, and submit them for verification. Next, build your shipping zones and rates in Settings > Shipping and delivery. Then place a test order with the Test payment gateway or Shopify Payments test mode, and switch testing off before launch.