Your C: drive is filling up with modpacks, or Settings has no Minecraft tab to click. This guide shows how to change CurseForge install location: add Minecraft first, then use the Change button. We ran it in a Windows 11 VM with CurseForge 1.326. If the app is not installed yet, our CurseForge install guide comes first.
Prefer to watch? See the video guide.
What the CurseForge Modding Folder Is and What Moving It Does
People search for the “install location”, while CurseForge calls the same folder the modding folder. It is where the app keeps your Minecraft modpacks, your mods and its own game files, split into Downloads, Install and Instances. We use the vendor’s term from here on.
The app creates the folder when you add Minecraft, and Minecraft did not need to run first. Standard puts it here on Windows:
%USERPROFILE%\curseforge\minecraft
Change is CurseForge’s own move tool. When the Move Modpacks prompt appears and you click Yes, your installed modpacks go to the new folder, and in our run a progress bar read “Moving existing modpacks to the new path…”. The old folder stayed in place. The prompt did not appear for every path we tried, as the table further down shows.
Heads up: pick a folder dedicated to CurseForge on a drive with room for your packs. CurseForge’s help pages ask for at least 10 GB free. When we picked the Desktop, the Downloads, Install and Instances folders landed straight on it, and the help pages list more places to avoid, covered below.
How to Change the CurseForge Install Location in Settings
The way to change CurseForge install location is short: make a new folder and point Settings at it. We timed only the move, about 10 seconds with one small profile.
- Open CurseForge and look at Game Specific in the sidebar. If Minecraft is listed, go to step 2. If it is empty, add Minecraft first, using the four short steps under The Minecraft Tab Is Missing Until You Add Minecraft below. Guest mode was enough in our run.
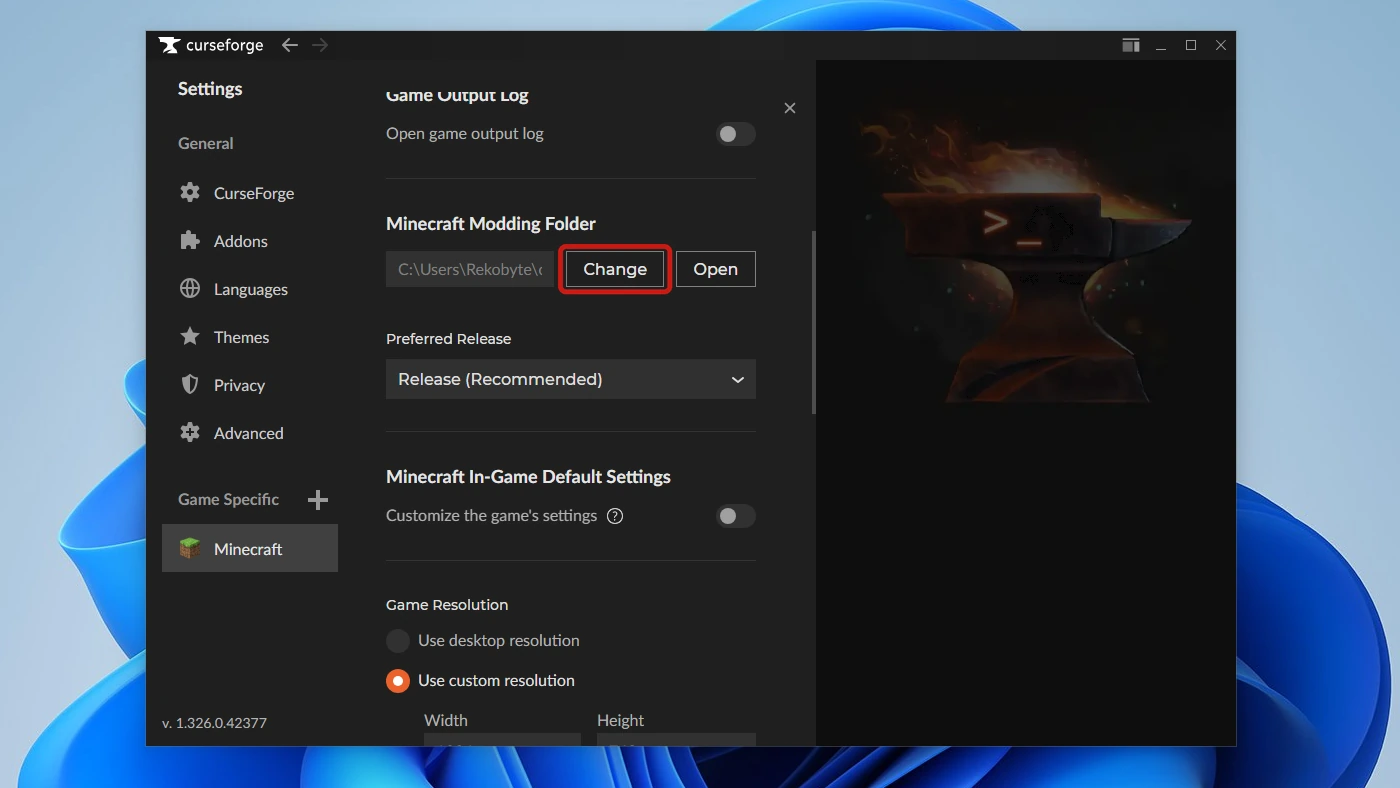
- Open Settings with the gear at the bottom of the sidebar, then click the Minecraft tab. The Minecraft Modding Folder row shows the current path with Change and Open buttons.
- Create the new folder in File Explorer, for example an empty C:\CurseForge. The folder picker in the next step also has a New folder button.
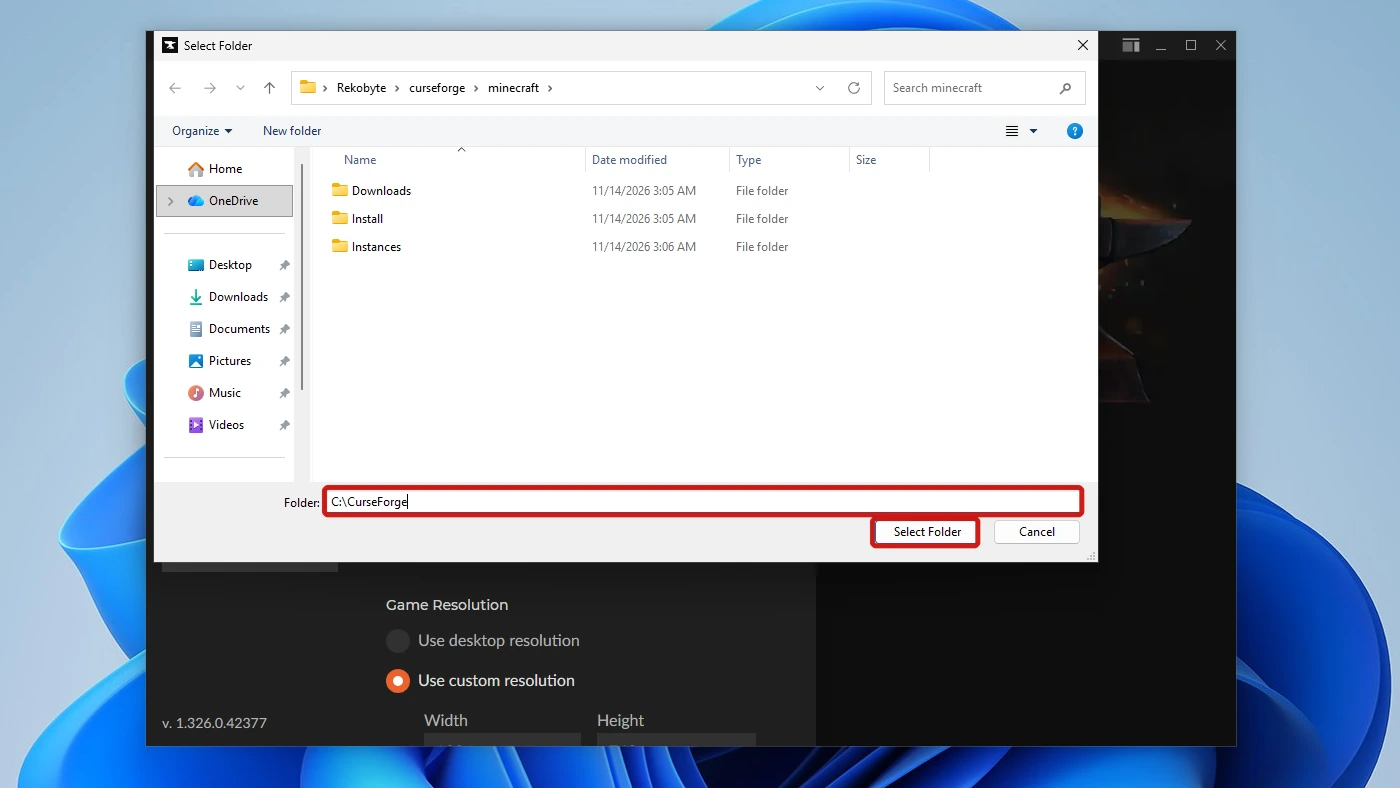
- Click Change beside the Minecraft Modding Folder. A Windows dialog titled Select Folder opens at the current modding folder. Choose your new folder and click Select Folder.
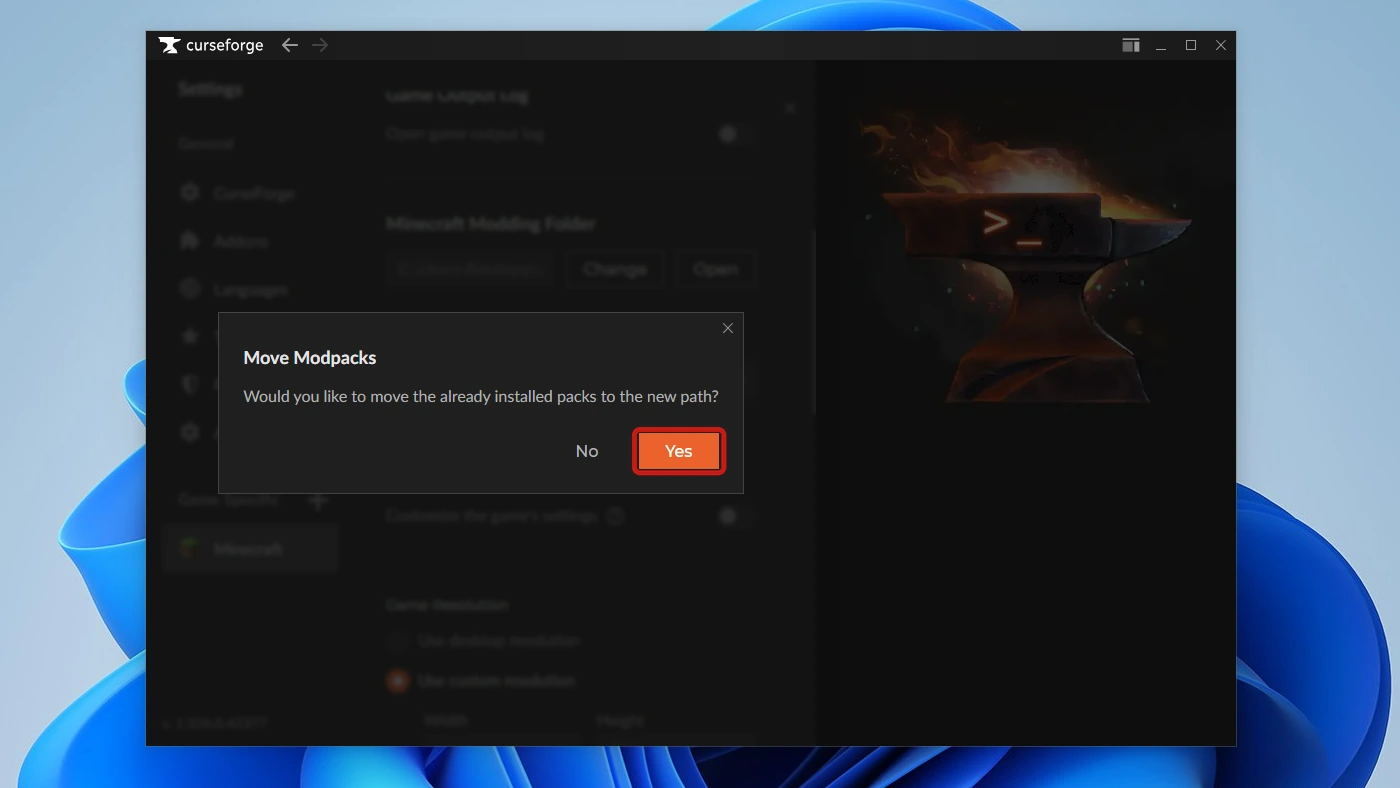
- Click Yes on the Move Modpacks prompt, which asks “Would you like to move the already installed packs to the new path?” The Moving existing modpacks to the new path… bar ran about 10 seconds. If no prompt appears, see the table below.
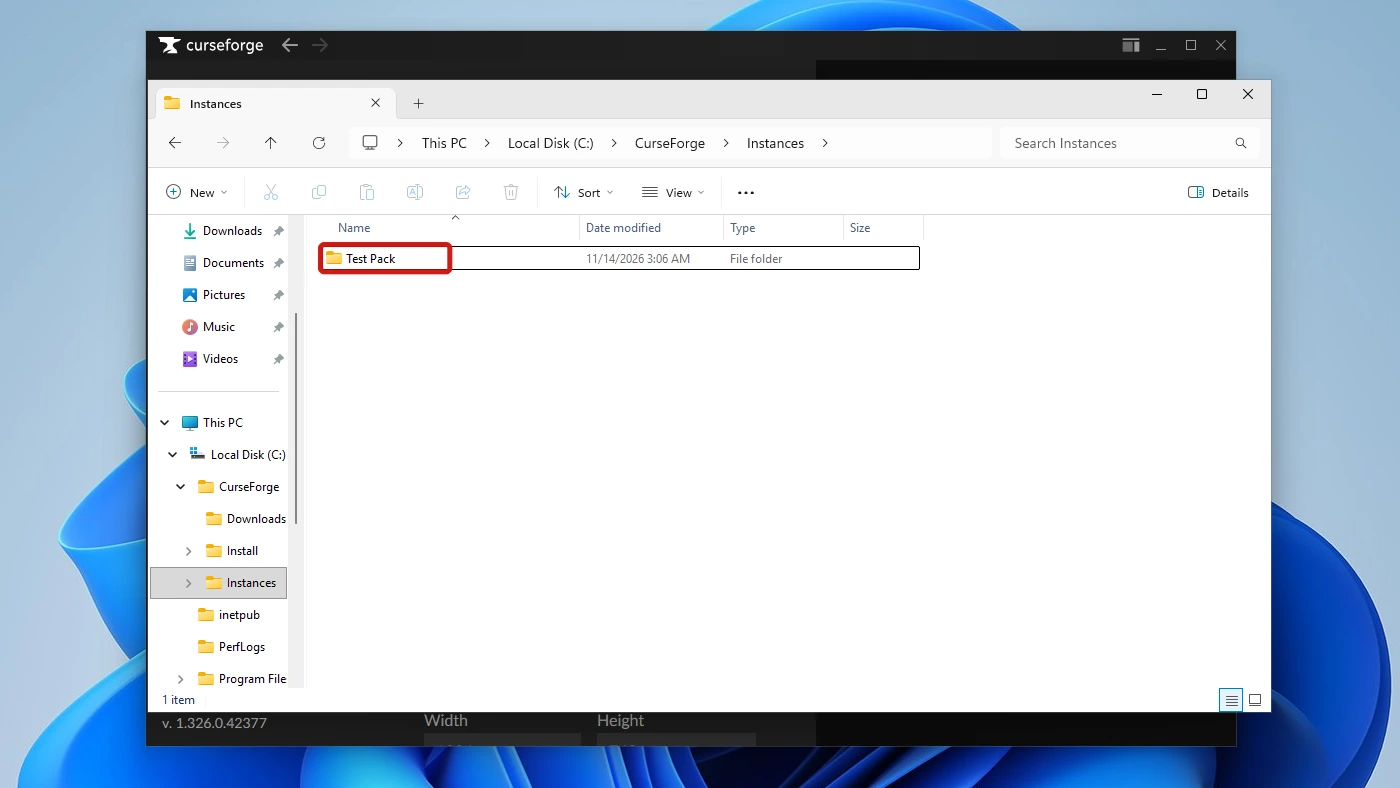
- Read the path field, then click Open beside it and open the Instances folder to check your packs. The field should show the folder you chose. In our run C:\CurseForge held Downloads, Install and Instances, and Instances held our Test Pack.
Note: the old folder stayed behind. After the move, the default folder still held Downloads, Install and an empty Instances folder. We did not compare its contents, so we did not delete it and cannot say whether deleting it is safe.
The memory slider sits on the same Minecraft tab you used to change CurseForge install location, and our guide to setting the memory per modpack explains the global and per-pack allocation this page does not cover.
Why You Can’t Change the CurseForge Install Location
If you cannot change CurseForge install location, the Minecraft tab does not exist until you add Minecraft, and the program’s own folder is a different folder that this setting does not move.
The Minecraft Tab Is Missing Until You Add Minecraft
On a fresh install, Game Specific was empty in our run, and Settings > General listed CurseForge, Addons, Languages, Themes, Privacy and Advanced, with no Minecraft entry. We reached the Minecraft tab after adding Minecraft:
- Click the + next to Game Specific and choose Add Minecraft (Java Edition).
- Pick Standard (Recommended) and click Continue.
- Choose Launch with Mojang (Launch with CurseForge asks you to link a Microsoft account), then click Continue.
- Open Settings and click Minecraft.
Folders CurseForge’s Help Pages Warn About
CurseForge’s help pages say these locations may cause problems: the Desktop or any folder inside it, a OneDrive folder, the vanilla .minecraft folder, a drive root such as C:\ and paths with non-English or special characters. A Desktop or Documents path can sit inside OneDrive, because OneDrive can back up those folders. We got no error on the paths we tried in version 1.326, so the table shows what we saw once.
| Location we picked | What we saw once in version 1.326 |
|---|---|
| Desktop | Accepted. The Move Modpacks prompt appeared, and Downloads, Install and Instances landed on the Desktop. |
| Drive root C:\ | No Move Modpacks prompt. The field became C:\CurseForge and the installed pack stayed in the old folder, not the new one. |
| OneDrive folder | No message and no prompt. The path field did not change. |
| C:\Café (accented letter) | Accepted, with no Move Modpacks prompt. The pack stayed in the earlier folder, C:\CurseForge. |
| .minecraft folder | Not tested. |
We did not find out why the prompt was missing for the drive root and the accented path. Read the path field after Select Folder. If it differs from your choice, or no prompt appeared, click Open and check Instances. If your packs are not there, click Change again and pick a plain folder such as C:\CurseForge, which gave us the prompt and moved the pack. The manual Instances copy under Change the CurseForge Install Location to Another Drive or PC is the other route.
Where the CurseForge Program Itself Installs
In version 1.326 the installer showed an Installation folder field prefilled with this path:
%LOCALAPPDATA%\Programs\CurseForge Windows
That is where the program lives, and you choose it in the installer. The installer’s folder and the modding folder are different paths:
- Program folder: the app itself, set in the installer.
- Modding folder: Downloads, Install and Instances, set in Settings > Minecraft.
Change the CurseForge Install Location to Another Drive or PC
You can change CurseForge install location to another drive with the same Change button, by picking a folder on that drive in step 4. We had no second drive in the VM and tested a folder on C: only. For another PC, CurseForge’s help page on moving the modding folder describes copying Instances by hand, which we did not test:
- On the old PC, open Settings, click Minecraft and click Open under Minecraft Modding Folder.
- Copy the Instances folder and transfer it to the new PC.
- On the new PC, set up a new modding folder, open it the same way and copy Instances into it, replacing that folder’s own Instances. The modpacks then appear.
Heads up: CurseForge’s error messages page says installing modpacks needs at least 10 GB free on both the system drive and the modding drive, because installs use temporary storage. Moving the folder off C: does not remove the need for free space on C:. Whether the old folder can be deleted to reclaim space is untested here, and the vendor page does not say.
Conclusion
To change CurseForge install location, add Minecraft with the plus beside Game Specific, open Settings, choose Minecraft, click Change beside the Minecraft Modding Folder, pick a folder such as C:\CurseForge and click Yes on the Move Modpacks prompt. That moves your installed modpacks, and the old folder stays behind.
Read the path field afterward and open Instances to confirm the packs arrived.
Video Guide
Watch the Change button used, a new folder picked and the moved packs checked in Instances.